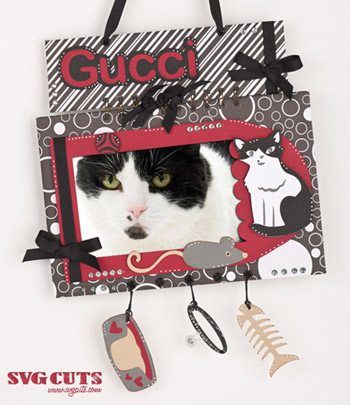
Christmas is a time of giving. For all that Mary and Leo do for me, I wanted to send them a little something special for Christmas. I know how much they love Gucci so I let my mind wander down that avenue. This frame is what I came up with. I love doing things other than cards or scrapbooking, with paper. I thought this would be nice, they can swap the picture out now and then. After all, that Gucci is just too cute!
SVG Collections Used
1. ![]() Double Layer Tags SVG Collection
Double Layer Tags SVG Collection
2. ![]() Frisky Felines SVG Collection
Frisky Felines SVG Collection
Dimensions
Here are the exact shapes, sizes, and colors I used. Size to the dimensions shown below with "Keep Proportions" checked in the Shape Properties window unless otherwise noted with height dimensions.
| Frisky Felines Collection | ||
| bed_top.svg | 2.73 | Your choice |
| bed_mid.svg | 2.73 | Your choice |
| bed_bot.svg | 2.73 | Your choice |
| mouse_top.svg | 1.27 | Light gray |
| mouse_bot.svg | 1.27 | Darker gray |
| fish.svg | 2.66 | Bone color |
| collar_top.svg | 2.11 | Black |
| collar_bot.svg | 2.11 | Silver |
| yarn_top.svg | 2.72 | Your choice |
| yarn_bot.svg | 2.72 | Your choice |
| gucci_top.svg | 2.68 | Black |
| gucci_mid.svg | 2.68 | White |
| gucci_bot.svg | 2.68 | Gray |
| Double Layer Tags Collection | ||
| window_large.svg (uncheck proportions, look in the note for how I made this window) | 8.8 x 5.12 | Red |
| Basic Shapes Library | ||
| rectangle (uncheck proportions, place three on mat, see note) | 8.625 x .5 | Red |
| Font (Ariel Rounded MT Bold) | ||
| Gucci | 4.62 | coordinating |
| Gucci (shadow/blackout) | 4.94 | coordinating |
Directions
1. I save backs of paper packs when I want a sturdier base. I cut my bases to the size I wanted...one for the larger main piece and one for the topper. You can make these any size you want. I then covered those with decorative papers. I have a Bind-it-All and that is what I used to join the two pieces together. If you don't have one you can use binder rings or even just use ribbons to tie the two together.
2. Cut out all the pieces you have chosen to use in your piece. I would add interest by inking, or using a Cuttlebug. You know me, I like to do the little dot thing with my gel pens (white or black). Also, use some dimensional adhesive for added depth. Here is how I did the window for the picture. I put a 4x6 rectangle on my mat to represent a photo. Then, I unchecked "Keep Proportions". I opened the window_large.svg and sized it over top of the rectangle so that a picture would fit in the open space. Make sure you don't go too big, you want the picture edges to be covered so the photo stays in. Once I had the size I wanted, I broke it apart and deleted the hole at the top. Make sure you "regroup" after this step so you don't lose your window part. I just didn't want the hole there. Then I made narrow rectangle strips and welded them to the three straight sides because I wanted that frame a bit wider...to accommodate foam tape when adhered and still have space to slide the photo in and out. After I cut it out, I trimmed up those added strips around the top curved part of the piece. You don't have to do this step if you don't want. I had a piece of acetate (transparencies for the copy store) that I put on the back to act as the glass in a frame. When you add your foam tape to the back of this, be sure to go as far to the outside edges as you can so the photo will go in and out easily.
3. Punch some holes at the bottom edge of the main piece. This is for hanging some of your images. Begin to plan out where you want things and adhere them down with your favorite adhesive. I chose the fish bone, collar, and cat bed to dangle from the bottom edge. Also, you can add some bling, rhinestones, or whatever you want. I tied ribbons on the binding coil, too. Punch two holes on the top edge for your ribbon for hanging. I set eyelets to these holes with my cropodile. It may take larger eyelets with using the chipboard core.
4. Cut out the name you chose to use in regular and shadow/blackout. Use whatever font you like. Adhere down with dimesionals.
Design Tips
I use American Crafts for the solid colors of cardstock. The patterned paper is just some I had on hand. I wanted to stay with the black and white theme with Gucci's coloring. You can do this for anything, pet or person, lol! It's easy to make it customized with all the great files Mary has designed for us. The limit is only your imagination. Hope you give it a try.


8 Responses to “Cheryl's Corner - Gucci's Picture Frame”