


Who hasn’t dreamed of attending a Masquerade Ball! My daughter loves to play dress up and I have to admit I do too. That’s how I dreamed up these fun, fanciful and easy to create masks, using SVGcuts.com files and a few other items. Make them exactly as I have here with the full directions and files used or use these as a guide to come up with some new ones. Have a ball!
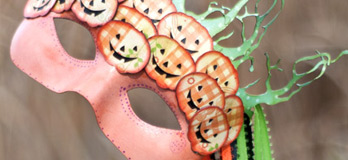
Pumpkin Queen
SVG Collections Used
Supplies Used
- Paper – DCWV Nana’s Kitchen Collection – Orange check with flowers
- Paper – DCWV Nana’s Kitchen Collection – Green with white polka dots
- Black Paper
- Ribbons – Green, Orange and Black
- Wood dowel rod 3/8” x 12” (available at Michaels or Hobby Lobby)
- Plain plastic face mask as a base (available at Michaels or Hobby Lobby)
- Paper glue
- Hot glue gun and glue
- Green acrylic paint (to paint wood dowel)
- Ink (orange to color mask and edge pumpkins)
- Purple Marker (optional) to embellish mask
Dimensions
| Halloween SVG Collection | ||
| jorange.svg (cut15 ) | 1.440" W x 1.072" H | DCWV Nana's Kitchen - Orange check with little vines and flowers |
| jyellow.svg (cut 15 ) | 1.450" W x 1.071" H | Black |
| tree.svg (cut 4) | 4.590" W x 3.931" H | DCWV Nana's Kitchen - Green with small white glitter polka dots |
Instructions
- Cut all SVGcuts.com files
- Ink the entire front of the mask orange
- Ink the edges of all top cut pumpkin pieces (optional)
- Glue tops and bottoms of pumpkin pieces together
- Glue SVGcuts.com tree pieces, horizontally at the top of the mask, overlapping the roots at the center, to form the crown.
- Starting at the top left side of the mask, near the eye. Work your way to the center. Gluing on all the pumpkins. Repeat this step starting from the other side, leaving an open spot in the center
- Glue the center piece on top of the others on the top row (when finished you will have two rows. With
- Glue the last pumpkin in the center near the top of the nose
- (Optional) draw dots with marker to embellish around the eyes and lower section of mask.
- (Optional) spray paint the back of the mask with black paint to give a more finished.
- (Optional) Seal with clear gloss sealer, to give it the look of leather
- Paint the wood dowel Green
- Hot glue a strip of ribbon around the wood dowel rod at the top and wrap it around like a candy cane. Hot glue the end to the bottom.
- Cut 6 – 25”strips of ribbon, 2 of each color
- Fold each ribbon in half and tie a double knot to the top of the wood dowel rod. Do this for all ribbons
- Hot glue the finished dowel rod to the upper left inside (back) corner of the mask. (For left handed people, glue on the right side)
Design Tips
- Inking gives a really great look to your piece
- Sealing with a gloss sealer will make your mask look as though they were made out of leather.
- When tying ribbon pieces to the dowel rod put a drop of hot glue on the top of the rod, then attach the center of the ribbon before tying your knot. This just makes it easier
Indian Princess

SVG Collections Used
![]() Exotic Indian Treasures SVG Collection
Exotic Indian Treasures SVG Collection
Supplies Used
- Card Stock – DCWV Nana’s Kitchen Collection – Blue and orange flower pattern
- Card Stock – DCWV Nana’s Kitchen Collection – green glitter pointed teardrop pattern
- Card Stock – Black
- Ribbons – Orange, Blue and Black
- Wood dowel rod 3/8” x 12” (available at Michaels or Hobby Lobby)
- Plain plastic face mask as a base (available at Michaels or Hobby Lobby)
- Paper glue
- Hot glue gun and glue
- Black acrylic paint (to paint wood dowel)
- Ink (optional) Orange and Blue
- Black spray paint (Optional)
- Clear Gloss Sealer (Optional) My favorite sealer is the “Golden” Gel Mediums Self Leveling Clear Gel, it can be pained on with a brush (available at Michaels or an art store) you could also use a spray gloss acrylic sealer if you prefer.
Dimensions
| Exotic Indian Treasures SVG Collection | ||
| lotus_bot.svg (cut 17) | 2.300"W x 1.889"H | DCWV Nana's Kitchen - Orange blue flower pattern |
| elephant_bottom.svg (cut 2) | 3.910"W x 2.814"H | Black |
| elephant_middle.svg (cut 2) | 2.910"W x 2.814"H | DCWV Nana's Kitchen - Green with glitter pointed teardrop pattern |
| leaf3_bot.svg (center in middle of elephants to make eyeholes) | 1.950"W x 1.234"H |
Instructions
- Paint the front of the mask with the black paint (acrylic or spray)
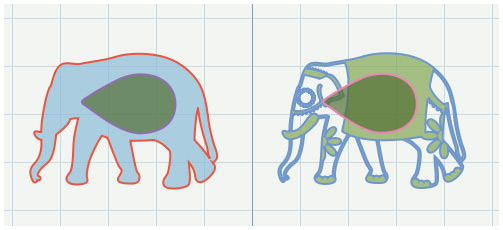
- When laying out your SVGcuts.com files, be sure to lay out your two elephants in opposite directions (mirror image) Do this for the tops and bottoms of the elephants.
- For the eyehole in the elephants, center the leaf3bot.svg in the middle of all elephants, as shown in photo. Do this for all 4 elephant pieces. Click Here for diagram
- Cut all SVGcuts.com files
- Ink all cut pieces (optional)
- Assemble the elephants
- Glue lotus flowers on to mask, starting at the top left side of the mask, near the eye. Work your way around the top to the center. Repeat this step starting from the other side, leaving an open spot in the center.
- Glue the center piece on top of the others on the top row
- Continue this process until you reach the eye area. (Be sure to leave a ¼” of space around the eye. (This will give an eyeliner effect.
- Refer to photo to help with gluing on all pieces
- To finish off the eyes, glue elephants on with the tails running down the center of the nose. Line up the top of the eyehole on the elephants to the top eyehole of the mask (the black of the mask and some of your other cut pieces will show at the bottom, giving a dimensional look)
- (Optional) spray paint the back of the mask with black paint to give a more finished.
- (Optional) Seal with clear gloss sealer (sealer gives it the look of leather)
- Paint the wood dowel
- Hot glue a strip of ribbon around the wood dowel rod at the top and wrap it around like a candy cane. Hot glue the end of the ribbon to the bottom.
- Cut 6 – 25”strips of ribbon, 2 of each color
- Fold each ribbon in half and tie a double knot at the top of the wood dowel rod. Repeat for all colors.
- Hot glue the finished dowel rod to the upper left inside (back) corner of the mask. (For left handed people, glue on the right side)
Design Tips
- Inking will give dimension and continuity to your piece.
- Sealing with a gloss sealer will make your mask look as though they were made out of leather.
- When tying ribbon pieces to the dowel rod put a drop of hot glue on the top of the rod, then attach the center of the ribbon before tying your knot. This just makes it easier
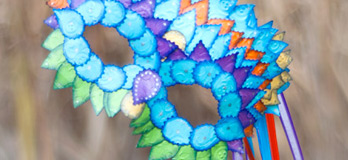
Carnival
SVG Collections Used
![]() Exotic Indian Treasures SVG Collection
Exotic Indian Treasures SVG Collection
Supplies Used
- Card Stock
- Ribbons – Purple, Blue, Orange
- Wood dowel rod 3/8” x 12” (available at Michaels or Hobby Lobby)
- Plain plastic face mask as a base (available at Michaels or Hobby Lobby)
- Paper glue
- Hot glue gun and glue
- Purple acrylic paint (to paint wood dowel)
- Ink (optional)
- Silver Marker (Optional)
- Embossing machine (optional)
- Black spray paint (Optional)
- Clear Gloss Sealer (Optional) My favorite sealer is the “Golden” Gel Mediums Self Leveling Clear Gel, it can be pained on with a brush (available at Michaels or an art store) You could also use a spray gloss acrylic sealer if you prefer
Dimensions
| Exotic Indian Treasures SVG Collection | ||
| lotus_bottom.svg (cut 4) | 2.300" W x 1.88"H | Yellow |
| lotus_bottom.svg (cut 9) | 2.300" W x 1.88"H | blue |
| leaf4_bot.svg (cut 18) | 2.300" W x 1.88"H | orange |
| leaf4_bot.svg (cut 15) | 2.300" W x 1.88"H | purple |
| leaf4_bot.svg (cut 35 ) | 2.300" W x 1.88"H | blue |
| leaf3_bot.svg (cut 14) | 0.755" W x1.199 "H | green |
| leaf3_bot.svg (cut 2) | 0.755" W x1.199 "H | yellow |
Instructions
- Cut all SVGcuts.com files
- Emboss all cut pieces (optional)
- Ink all cut pieces (optional)
- Begin gluing on the largest pieces, starting at the top left side of the mask, near the eye. Work your way to the center. Repeat this step starting from the other side, leaving an open spot in the center
- Glue the center piece on top of the others on the top row
- Continue this process with your smaller pieces, till you reach the eye area.
- Once you have reached the eyeholes, start gluing the green pieces to the bottom edge.
- To finish off the eyes, glue the remaining pieces around the eyes (refer to photos of mask for arranging all your cut pieces)
- Glue on overlaying pieces to the top of the nose to give a finished look.
- (Optional) draw dots with marker for additional decoration
- (Optional) spray paint the back of the mask with black paint to give a more finished.
- (Optional) Seal with clear gloss sealer, to give a leather look
- Paint the wood dowel
- Hot glue a strip of ribbon around the wood dowel rod at the top and wrap it around like a candy cane. Hot glue the end to the bottom.
- Cut 6 – 25”strips of ribbon, 2 of each color
- Fold each ribbon in half and tie a double knot to the top of the wood dowel rod. Repeat for each color
- Hot glue the now finished dowel rod to the upper left inside (back) corner of the mask. (For left handed people, glue on the right side)
Design Tips

Fleurette - SVGCuts Design Team Artist
- Double-sided or solid core card stock will give a move finished look.
- When tying ribbon pieces to the dowel rod put a drop of hot glue on the top of the rod, then attach the center of the ribbon before tying your knot. This just makes it easier
- Inking and embossing gives great dimension and texture
- Sealing with a gloss sealer will make your mask look as though they were made out of leather.
I can imagine having a whimsical masquerade tea party with these fun and fanciful masks. They would also make great gifts or wall decorations. Have a “ball” and create!