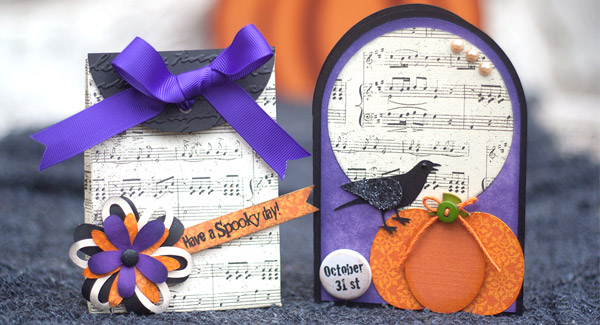
I have a cute Halloween treat bag with matching card to show you guys today. This simple project would be easy to make in multiples for teachers or co workers. Simple, quick and cute!
SVG Collections Used
![]() Crisp Days of Fall SVG Kit
Crisp Days of Fall SVG Kit
![]() Fall Harvest SVG Kit
Fall Harvest SVG Kit
![]() Elmhurst Hollow SVG Kit
Elmhurst Hollow SVG Kit
![]() Tied Surprise Gift Boxes SVG Collection
Tied Surprise Gift Boxes SVG Collection
Supplies Used
- Black card stock
- Ivory card stock
- Pattern Paper
- Flair Button
- Button
- Hemp Cord
- Course Glitter
- Pears (black and ivory)
- Distress Ink (black soot and dusty concord)
- Foam dots
- Adhesive
- Ribbon
- Brad
- Embossing Folder – Cuttlebug Script Texture
Dimensions
Card
| Elmhurst Hollow - Full Moon Card | ||
| card_base.svg | 5.5"h x 7.700"w | black cardstock |
| moon.svg | 3.350"h x 4.00"w | music note paper |
| Crisp Days of Fall - Pumpkin | ||
| bottom.svg | 2.365"h x 3"w | orange pattern paper |
| top.svg | 2.365"h x 3"w | solid orange |
| stem.svg | .510"h x 3"w | green |
| Fall Harvest - Crow | ||
| body.svg | 1.5"h x 2.85"w | black cardstock |
| wing.svg | .530"h x 2.85"w | black cardstock |
Gift Box
| Tied Surprise Gift Boxes | ||
| trellis_box.svg | 7.275"h x 10"w | music note paper |
| trellis_box_top.svg | 4.335"h x 10"w | black cardstock |
| Elmhurst Hollow - Full Moon Card | ||
| flower_bottom.svg (Cut 2) | 2.240"h x 2.215"w | black cardstock (break apart, bottom flower in group) |
| flower_bottom.svg | 2.070"h x 2.300"w | cream cardstock (middle flower in group) |
| flower_top.svg | 1.685"h x 1.760"w | orange pattern paper (break apart, bottom flower in group) |
| flower_top.svg | 1.540"h x 1.505"w | purple cardstock (top flower in group) |
Instructions
Card
- Open card base, resize. Silhouette Studio users use knife tool to trim off fence. SCAL users, position a rectangle over the fence portion and use Path >>> Back Minus Front to trim off fence. Or you can trim manually.
- Cut all layers as listed
- Assemble pumpkin with foam dots
- Add glitter to crow’s wing
- Adhere layers to card base
- Thread hemp cord through button, tie bow, adhere to pumpkin stem.
- Add pearls
Gift Box
- Open trellis box and resize and cut.
- Emboss black trellis_box top
- Assemble bag.
- Cut flower layers, layer together with brad and adhere to front of the box. .
- Stamp sentiment on a strip of paper, trim ends, adhere to front of the box.
- Tie blag closed with ribbon.
Design Tips
- Create a cool background by using distress inks on white or ivory paper. I used Dusty Concord distress ink on ivory paper to create my purple background layer.


