

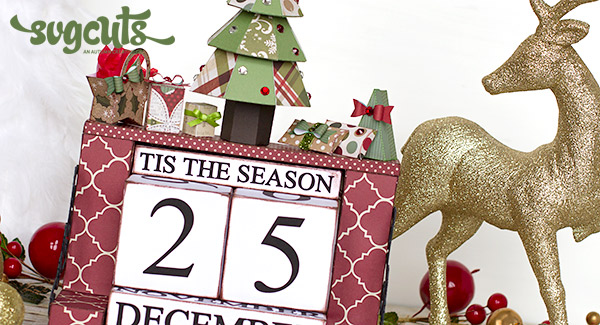


For the longest time I have wanted to create my very own perpetual calendar out of paper. I finally came up with a design that could easily be modified to fit any season or match any decor. This holiday season make yourself this beautiful Christmas Block Calendar or surprise someone with this very functional time piece gift!
SVG Collections Used
![]() 3D Letters SVG Kit
3D Letters SVG Kit
![]() Caramel Apple Pie SVG Kit
Caramel Apple Pie SVG Kit
![]() Christmas Gift Bags and Boxes SVG Kit
Christmas Gift Bags and Boxes SVG Kit
![]() French Quarter Ironwork SVG Collection
French Quarter Ironwork SVG Collection
![]() Fun and Games SVG Kit
Fun and Games SVG Kit
![]() Mistletoe Manor SVG Kit
Mistletoe Manor SVG Kit
![]() North Pole Express SVG Kit
North Pole Express SVG Kit
![]() Rockin and Rollin SVG Kit
Rockin and Rollin SVG Kit
![]() Spirits of Christmas Past SVG Kit
Spirits of Christmas Past SVG Kit
Supplies Used
- Bazzill Basics Paper
- Patterned Paper - Handmade Holiday by Simple Stories
- Patterned Paper - All is Bright by My Minds Eye
- Self-adhesive rhinestones
- Ribbon
- Brown ink pad
- Scotch Quick-dry glue
- Tape
- Tweezers
- Silhouette Cameo using SSDE
Dimensions
| 3D Letters SVG Kit - L | ||
| l1.svg | 9.044" H x 9.044" W (cut 2) | Red and Beige Pattern |
| Caramel Apple Pie SVG Kit - Crate | ||
| crate_board1.svg | 3.754" H x 10.815" W | Red and Beige Polka Dot |
| crate_bottom1.svg | 7.198" H x 10.825" W | Beige and Red Chevron |
| crate_bottom2.svg | 5.357" H x 10.825" W | Beige and Red Chevron |
| crate_bottom1.svg | 3.771" H x 7.279" W | Beige and Red Chevron |
| crate_bottom2.svg | 5.068" H x 7.279" W | Beige and Red Chevron |
| Christmas Gift Bags and Boxes SVG Kit | ||
| (Christmas Tree Box) | ||
| box_bottom.svg | 3.065" H x 2.671" W | Green Stripe |
| lid.svg | 1.842" H x 2.671" W | Green Stripe |
| (Joy Star Bag) | ||
| bag.svg | 3.488" H x 4.089" W | Brown Holly |
| (Pillow Box) | ||
| box.svg | 2.113" H x 2.188" W (cut 2) | Polka Dots |
| French Quarter Ironwork SVG Collection | ||
| corner1.svg | 2.516" H x 4.604" W (cut 6) | Black |
| Fun and Games SVG Kit (Golf Bag) | ||
| bag1.svg | 4.548" H x 4.534" W | Brown |
| Mistletoe Manor SVG Kit (Mistletoe Manor) | ||
| house2.svg (read directions before resizing) | 5.820" H x 6.240" W (cut 3) | White |
| house2.svg (read directions before resizing) | 3.663" H x 6.240" W | White |
| North Pole Express SVG Kit (Extras) | ||
| box1.svg | 2.692"H x 2.080" W | Christmas |
| 1.790" H x 1.383" W | Beige Music | |
| box2.svg | 2.563"H x 2.080" W | Christmas |
| 1.704" H x 1.383" W | Beige Music | |
| Rockin and Rollin SVG Kit (Stack of Records Container) | ||
| die1.svg (read directions before resizing) | 8.501" H x 11.656" W (cut2) | White |
| Spirits of Christmas Past SVG Kit (Tree Box) | ||
| accents_bottom.svg | 1.483" H x 7.838" W | Christmas Stripes |
| accents_middle.svg | 1.364" H x 7.838" W | Green Floral |
| accents_top.svg | 1.594" H x 7.838" W | Polka Dots |
| tree_bottom.svg | 6.343" H x 7.838" W | Green |
| tree_middle.svg | 6.530" H x 7.838" W | Green |
| tree_middle_ring.svg | 2.776" H x 7.838" W | Green |
| tree_top.svg | 5.244" H x 7.838" W | Green |
| Free Design (02.25.12 - 3D Bow) | ||
| bow.svg | 1.402" H x 3.184" W | Red |
| 1.022"H x 2.320" W (cut4) | Red and Green | |
| Basic Shapes Library | ||
| square | 1.214" H x 1.214" W (cut 6) | White |
| 0.767" H x 0.767" W (cut 2) | White | |
| rectangle | 0.337" H x 8.824" W (cut 3) | Red and Beige Polka Dot |
Instructions
Storage Structure
- Begin by creating the structure that will store the blocks. Open l1.svg. Resize and cut out 2 L's. Assemble and set aside.
- Next open up the crate_bottom1.svg and crate_bottom2.svg. Resize, cut and assemble. Set aside. Note: There are 2 different sizes that you will need of each file, refer to chart above.
- Open up the crate_board1.svg, resize, cut and assemble. You now have all the pieces to glue the storage structure together.
- Sandwich the smaller crate bottom board (created in step 2) in between the two letter L's you created in step 1. Glue the outside edges of the crate board to the inside of the base of the L's. Use a very flat surface to ensure your project lines up correctly.
- Take the bigger crate board you set aside from step 2, and glue it to the back side of the L's. This will close in the back side of the structure.
- Lay the final crate board across the top of the L's. Glue it in place ensuring all corners are lined up correctly.
- Cut out 3 long rectangular strips from the Basics Shape Library, see above for size. Glue all 3 strips together by staking them on top of each other. Glue reinforced strip along the bottom of the front of the container.
- Embellish the sides of the structure by resizing and cutting out 6 corner1.svg from the French Quarter Ironwork Collection. Glue 3 together to create one for each side. Glue to the outside of each other.
Blocks
- Open the die1.svg, resize, ungroup and delete the circles. Cut 2 and assemble. Set aside.
- Open the house2.svg. Before resizing this file you need to delete the large house panel labelled with a number 2 and a small tab labelled with a number 3. All you need is the top right hand shape to create the rectangular block shape. Group that shape with its cut lines. Resize as indicated in the chart above. Copy and paste 2 more. Cut out and assemble all 3. You will notice that the ends are not finished. Cut out and glue 6 squares from the basic shape library to the ends of the blocks to close them in.
- Copy and paste the shape you created in step 2 again to create the smaller rectangular box that will sit on top of the cubes. Resize using the smaller size indicated in the chart. Cut out and assemble. Repeat the same process of adding the squares to the ends of the blocks only this time using the smaller square size.
- Ink the edges of the blocks if you like that look.
- You are now ready to add the numbers and wording to the blocks. I used the Times New Roman Font for my Project. The sizing of the letters and numbers will depend on the font you use. Play with what you like by visualizing it on the screen first. Once you are happy with your choices cut out your letters and numbers. NOTE: To ensure all your numbers are represented each cube must have a 0, 1, and a 2. It doesn't matter which cube ends up with the 3, 4, 5, 6, 7, or 8. The number 6 will also be used as the number 9. This will cover all 12 faces of the cubes. For the Month blocks, start at January and work around each face, there are 3 blocks which works out perfectly for the 12 months.
Optional Seasonal Decorations
- All the pieces I used to decorate the calendar were not modified only resized. To each piece, open files, resize, cut and assemble as per SVG Cuts instructions.
Design Tips

Ilda Dias - SVGCuts Design Team Member
- To ensure you get perfectly aligned blocks and straight angles, add glue to your tab and then fold the box down on onto a flat surface. Press the seam together until dry, pop back up.
- Before cutting out the letters to add to your blocks you may want to create some cut lines around words or add a frame around them. This negative cut out will help you transfer your letters back onto the blocks ensuring that they are perfectly aligned and centered. Use some tape to secure the cut out in place and then add small amount of glue to where your letters will be placed. (See the last two pictures)
- Tweezers are really helpful when working with small cut outs like the letters. They will also keep your paper from getting glue all over it if your fingers are all sticky!
- Another option that would make things easier would be to weld your letters together first before cutting them out.
- If you are going to create this to keep out all year round, select neutral papers that match the decor or colors of your space. Use other paper pieces to decorate around it to coordinate with the upcoming holiday or season!
I had so much fun coming up with this project and have enjoyed changing the date every day since. Hope this Christmas Block Calendar has inspired you to create one of your own!