

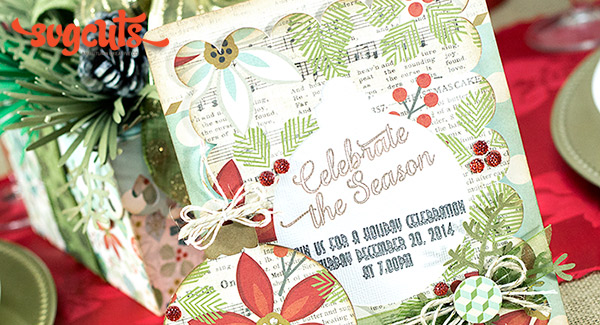


There' s no better way to start off the festive season than by hosting a Christmas Celebration! Wow your guests this year with these awesome interactive invitations. Tie a loop in the top of the ornament piece so that your guests can place it on their tree for a keepsake to remind them of the occasion for years to come.
SVG Collections Used
![]() Elegant Framed Invitations SVG Kit
Elegant Framed Invitations SVG Kit
![]() Christmas in the Village SVG Collection
Christmas in the Village SVG Collection
Supplies Used
- Pink Paislee Snow Village Paper Collection
- Red Rhinestones
- Liquid Pearls
- Button
- Ribbon
- Twine
- Scotch Quick-dry glue
- Dimensional Foam Dots
- Distress Ink
Dimensions
| BASIC ELEGANT FRAMED INVITATION | ||
| basic_bottom.svg | 5.485"W x 6.314"H | Dotted Pattern Paper |
| basic_top.svg | 5.485"W x 6.915"H | Poinsettia Pattern Paper |
| CHRISTMAS IN THE VILLAGE ORNAMENT CUT-OUT | ||
| bottom.svg | 3.198"W x 3.870"H | Cut out of basic_top |
| hanger.svg | 0.891"W x 0.787"H | Craft Paper |
Instructions
- Cut out basic_bottom as per measurements in table above.
- Cut ornament hanger as per measurements in table above. Now group ornament bottom and hanger together and place on top of basic_top. Subtract the ornament from the basic_top so that it forms a negative space for your text when you cut it out. (See image below)
- Keep the negative ornament piece and adhere the hanger to it. Add a loop and a bow with some twine.
- Add another basic_top into your software. Now add your desired text (I used the pen holder in my Silhouette Cameo for this) and cut out of white cardstock.
- Adhere basic_top with ornament window directly onto the basic_top with text. Add your twine and ribbon around it before adhering with dimensional foam dots onto basic_bottom.
- Place the ornament back into the window (it should fit nice and snug) and embellish further with buttons and pearls as desired.
Design Tips

Chantel - SVGCuts Design Team
- When designing your text on the invitation, place the first piece with the ornament subtracted from it directly over the top (see image). That way you can design your text within the window and so ensure that it fits perfectly.
- I like to use liquid pearls to add some additional texture on patterned paper. Just ensure that you do it after you’ve cut the pieces out so that it doesn't interfere with the cutting process of your machine. Tap from the bottom to get a nice smooth, rounded pearl and then set it aside to dry completely before working with it.
This invitation is really quick and easy to put together so you can make a whole bunch in no time! I hope you like it and that I've inspired you to make some of your own this year!