

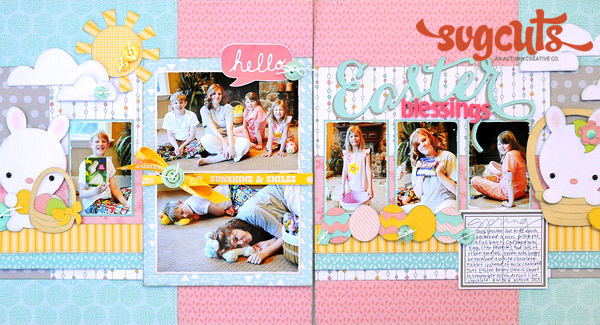


You know it’s time for Spring when the sunshine and critters start appearing. Check out the sweet baby bunnies from the Spring Bunnies SVG Collection used on this two page layout about Easter.
SVG Collections Used
![]() Spring Bunnies SVG Collection
Spring Bunnies SVG Collection
![]() Peony Cottage SVG Collection
Peony Cottage SVG Collection
![]() Ryan’s Playdate SVG Collection
Ryan’s Playdate SVG Collection
![]() Easter Blessings Caption Freebie from 3.08.2013
Easter Blessings Caption Freebie from 3.08.2013
Supplies Used
- Adhesive
- Foam Squares
- Solid and Patterned Papers
- Gray Ink Pad
- Sentiment Stamp
- Yellow Ribbon
- Blue Enamel Dot Sticker
- Black Pearl Dot Stickers
- Pink Chalk
- Journal Block
- Pink Letter Stickers
- Buttons
- White Twine
- Journaling Pen
- Trimmer
- Scissors
- Sewing Machine with White Thread
Dimensions
| Spring Bunnies (Bunnies - Egg Hunt Bunny) | ||
| basket.svg | 1.660" W x 4.500" H | Kraft |
| green.svg | 0.747" W x 4.500" H | Green, Yellow, Blue |
| pink.svg | 0.747" W x 4.500" H | Pink |
| white.svg | 2.589" W x 4.500" H | White |
| yellow.svg | 0.941" W x 4.500" H | Yellow Dot |
| Spring Bunnies (Bunnies - Basket Bunny) | ||
| basket.svg | 3.946" W x 4.219" H | Kraft |
| green.svg | 1.272" W x 4.219" H | Green, Yellow, Blue |
| pink.svg | 0.899" W x 4.219" H | Pink |
| white.svg | 2.506" W x 4.219" H | White |
| Spring Bunnies (Eggs) | ||
| green.svg | 5.000" W x 1.388" H | Blue |
| light_pink.svg | 5.000" W x 1.361" H | Pink Stripe |
| pink.svg | 5.000" W x 1.388" H | Pink |
| yellow.svg | 5.000" W x 1.310" H | Yellow Dot |
| Easter Blessings Caption Freebie from 03.08.2013 | ||
| easter.svg.svg | 6.938" W x 3.810" H | Gray, Blue |
| Peony Cottage (Extras) | ||
| sun_beams_top.svg | 2.951" W x 2.947" H | Yellow Stripe |
| sun_beams_bottom.svg | 1.828" W x 1.828" H | Yellow Graph |
| Ryan's Play Date (Fly A Kite Lever Card) | ||
| clouds.svg | 3.753" W x 3.839" H | White (3) |
Instructions
Ink all edges of papers and die cut pieces with gray ink, if desired.
- Use two sheets of white cardstock as the layout base. Cut two sheets of blue patterned paper to 11 13/16” x 11 5/8”. Adhere to white cardstock base so that there is a 3/16” white border around three sides.
- Cut a 4 ¾”” x 11 5/8” block of pink patterned paper. Adhere to the left page so that the right edge is flush with the seam. Use a sewing machine to zig zag stitch along the left edge of the pink patterned paper.
- Cut a 7 ¼” x 11 5/8” block of pink patterned paper. Adhere to the right page so that the left edge is flush with the seam. Use a sewing machine to zig zag stitch along the right edge of the pink patterned paper.
- Use a sewing machine to straight stitch around the border of each page.
- Cut a 6” x 8” block of blue and white patterned paper. Adhere to the left page so that the right edge is flush with the seam, and the top is 2 ¼” down from the top edge of the layout.
- Mat two horizontal 5” x 3 ½” photos together on white cardstock leaving a 1/16” edge all the way around. Center and adhere to the blue and white patterned paper.
- Thread a yellow ribbon around the back of the blue and white patterned paper block and tie a ribbon in a bow around the middle of the block in between the two photos. Use white string to tie a button to the center of the bow.
- Cut a speech bubble caption from a sheet of patterned paper using scissors. Adhere to the top right corner of the photo. Tie a button with white string and adhere it to the bottom right corner of the speech bubble cut out.
- Cut a 3 ¼” x 7 ½” block of white patterned paper. Adhere to the left page to the left of the photo block.
- Cut a 2 ¼” x 7 ½” block of gray polka dot patterned paper. Adhere to the left page to the left of the white patterned paper.
- Cut a 6” x 4” block of pink patterned paper. Tuck and adhere to the left of the photo block, overlapping the white patterned paper and gray polka dot patterned paper, 2 ¼” up from the bottom edge of the layout.
- Cut a 6” x ½” strip of blue patterned paper. Adhere to the bottom of the 6” x 4” strip of pink patterned paper.
- Cut a 6” x 1” strip of yellow striped paper. Adhere to the pink patterned paper just above the blue strip of paper. Use a sewing machine to zig zag stitch along the seam of the yellow and blue papers.
- Mat a 2 1/8” x 3 ¼” vertical photo with blue cardstock. Adhere to the page to the left of the photo block, overlapping the pink patterned paper. The photo should be placed approximately 4 3/8” from the top edge of the layout and 3 3/8” from the left edge of the layout.
- Cut and assemble the Egg Hunt Bunny from the Spring Bunnies SVG Collection. Add pink chalk to the bunny’s ears and black pearl stickers for his eyes. Use foam square to adhere the bunny to the left of the small vertical photo. Tie a button with white twine and adhere to the left of the bunny.
- Cut the clouds from the Ryan’s Play Date SVG Collection. Cut and assemble the sun from the Peony Cottage SVG Collection. Adhere to the left page above the bunny. Add buttons tied with string, as desired.
- Cut an 8 ¼” x 7 ½” block of white patterned paper. Adhere to the right page 2 5/8” from the top edge of the layout with the left edge flush with the seam.
- Cut a 2 ½” x 7 ½” block of gray polka dot patterned paper. Adhere to the right page to the right of the white patterned paper.
- Cut an 11 13/16” x 4” strip of pink patterned paper. Adhere horizontally to the right page2 ¼” from the bottom edge overlapping the white and gray polka dot patterned papers, with the left edge flush with the seam.
- Cut an 11 13/16” x ½” strip of blue patterned paper. Adhere to the bottom of the pink strip of patterned paper.
- Cut an 11 13/16” x 1” strip of yellow stripe patterned paper. Adhere to the strip of pink patterned paper just above the blue strip. Use a sewing machine to zig zag stitch along the seam of the yellow and blue strips.
- Mat three vertical 2 1/8” x 3 ¼” photos with blue cardstock. Adhere to white patterned paper on the right page overlapping the pink strip so that they are 4 ½” from the top edge of the layout.
- Cut the two Easter Blessings Caption freebies. Use scissors to trim out the swirl of the letter “r” on the end of the word. Discards the “blessings” portion of the caption. Adhere the blue layer on top of the gray layer so that they are slightly offset from one another, creating a shadow effect. Adhere the “Easter” title word at a slight angle above the three vertical photos on the right page. Use pink letter stickers to spell out the word “blessings” below the die cut “Easter” word.
- Adhere a journal block below the third vertical photo on the right page. Use a stamp to stamp the word “spring” to the top of the journal block. Add your journaling with a black pen.
- Cut and assemble the eggs from the Spring Bunnies SVG Collection. Adhere to the right page with foam squares below the first two vertical photos. Tie three small buttons with white string and adhere to the eggs using glue dots.
- Cut and assemble the Basket Bunny from the Spring Bunnies SVG Collection. Add pink chalk to the bunny’s ears and black pearl stickers for her eyes. Add a blue enamel dot sticker to the center of the flower. Adhere to the right page to the right of the three photos using foam square. Add the yellow and blue eggs and a button tied with white twine to the bottom right corner of the bunny.
- Cut the remaining clouds from the Ryan’s Play Date SVG Collection. Adhere to the right page above the Basket Bunny. Use foam squares to adhere the two smaller clouds. Add a button tied with white twine to the largest cloud.
Design Tips

Jana Eubank - SVGCuts Design Team Member
- Mix die cut words with letter stickers for an eclectic feel.
- Look for elements that you can hand cut from patterned paper that you can use with your die cuts or add to your project as page elements. The speech bubble patterned paper I used on this page would be adorable paired with one of the Spring Bunnies on a card or treat bag!
- Don’t have two sheets of blue patterned paper for the page background? Don’t worry, you can still achieve the same look. Instead of using two sheets of blue patterned paper and adhering the pink blocks on top of them for the background, you could get the same look by cutting ONE sheet of the blue paper into two blocks and piecing them together with the pink pieces in the same way.
What kinds of activities get you excited for Spring? Have you captured these special moments in your memory keeping yet?