

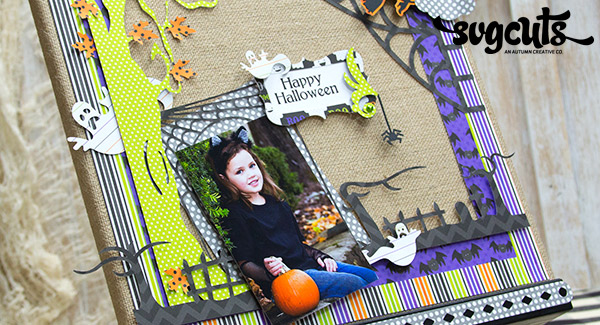


This basic canvas is a perfect way to display a picture of your favorite spooky guy or girl. It is very quick and easy. I did not glue the photo frame to the canvas, a great idea if you want to change it from year to year.
SVG Collections Used
![]() Fright Night SVG Kit
Fright Night SVG Kit
![]() Gothic Flourishes SVG Collection
Gothic Flourishes SVG Collection
![]() Halloween SVG Collection
Halloween SVG Collection
![]() Caramel Apple Pie SVG Kit
Caramel Apple Pie SVG Kit
![]() Bella's Halloween Strips SVG Collection
Bella's Halloween Strips SVG Collection
![]() Spooky Silhouettes SVG Collection
Spooky Silhouettes SVG Collection
![]() Bunny Hop SVG Kit
Bunny Hop SVG Kit
Supplies Used
- 1 Natural Canvas
- 1 Black Easel
- Pop Dots
- Scotch Quick Dry Adhesive
- Doodlebug Design inc. Halloween parade papaer
- 3 Small Dots (Black)
- 1 Small Dot (Grey)
- 1 Medium Dot (Green)
- Happy Halloween Stamp (Close To My Heart)
Dimensions
| Fright Night SVG Kit | ||
| (Lighted Pin-Up Witch Bag) | ||
| witch_bottom.svg | 3.056"wX3.063"h | Orange |
| black.svg | 2.942"wX2.949"h | Black |
| (Spiderweb 8 X 10 Vinyl) | ||
| vinyl.svg | 4.077"wX5.236"h | Black/Grey |
| Spooky Silhouettes SVG Collection | ||
| ghost1.svg | 3.134"wX1.747"h | White |
| ghost1.svg | 1.529"wX0.852"h | White |
| ghost2.svg | 2.045"wX1.072"h | White |
| star1.svg | 1.366"wX1.371"h | Black |
| Bella's Halloween Strips SVG Collection | ||
| graveyard.svg | 11.412"wX2.204"h | Black Chevron |
| Gothic Flourishes SVG Collection | ||
| bracket1.svg | 3.376"wX1.826"h | Black/White |
| cobweb_corner2.svg | 6.000"wX5.582"h | Black |
| spider_flourish.svg | 1.224"wX2.890"h | Green/Black |
| Bunny Hop SVG Kit (Extras) | ||
| clouds.svg | 3.012"wX10.886"h | Grey |
| Halloween SVG Collection | ||
| tree.svg | 4.933"wX10.886"h | Green |
| Caramel Apple Pie (Extras) | ||
| maple_leaf2_top.svg | 0.713"wX0.709"h | Orange |
| maple_leaf2_top.svg | 0.836"wX0.832"h | Orange |
| Basic Shape Square | 11.500"wX11.500"h | Purple/Stripe |
| Basic Shape Square | 8.500"wX8.500"h | N/A |
| Basic Shape Square | 9.750"wX9.750"h | N/A |
| (The N/A means that it is a cut out that won't be used in the project) |
Instructions
- To make the borders you will cut a 8.500" and a 9.750" square inside a 11.500" square. Make sure you open the largest shape first and then insert the 2 smaller pieces for each of the border pieces. Make sure to center both before cutting. This gives you a great layered border. Glue the 2 border pieces together and glue on the canvas. Add the small black dots to the upper left of the frame.
- Open and cut the Spiderweb vinyl and cut. Open this file again and separate the frame. Delete everything but the large rectangle and the oval. You will use the oval to fussy cut your photo. The largest piece will be the background that is behind the spiderweb frame.
- Next cut the tree and the graveyard scene (which will be hand cut like the photo shows). Use pop dots for dimension and add as shown.
- You can place the frame with your photo behind the tree and border.
- Cut the leaves, ghosts, bracket, witch, clouds and stars. Cut the flourish spider on the bracket in black and green. Cut off the bottom portion of the green hang down spider and glue to the black piece. Add the green dot at the bottom of the flourish. Glue to the stamped bracket.
- Use glue or pop dots and add all of the other elements.
- The trim on the easel is optional. I used the strap piece from the Lighted Witch Bag.
Design Tips

Kathy Helton - SVGCuts Designer
- The canvas will soak up a lot of glue. Go heavier with the glue but not too much or paper will curl. I also turned the canvas over and pressed down while it dried.
- I mentioned earlier that I did not glue down the frame so it can be changed from year to year. Your option.
- Use bright paper, the natural background really makes it pop.
- Curl the clouds with your fingers. Gives them a cool 3D look. I used several different kits and collections, see what you have and you can always substitute to make it your own. This project is so quick and easy, consider making it for a friend!