

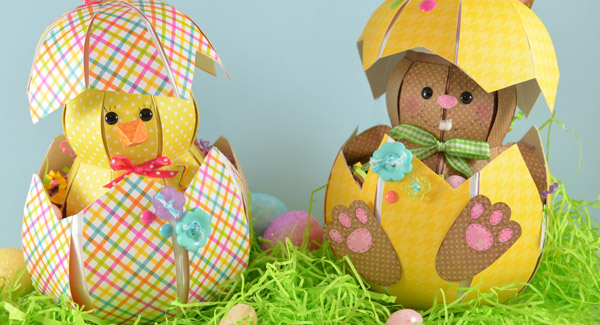

Make that someone crack a smile this Easter with these Easter egg cuties! Fill the egg with candy, and a little something special for the inside of the bunny or chick.
SVG Collections Used
![]() Poplar Street Tulips SVG Kit
Poplar Street Tulips SVG Kit
![]() Christmas Open House SVG Kit
Christmas Open House SVG Kit
![]() Egg Hunt SVG Kit
Egg Hunt SVG Kit
![]() Bunny Hop SVG Kit
Bunny Hop SVG Kit
Supplies Used
- American Craft Card Stock
- Bazzill Card Stock
- Doodlebug Hello Sunshine Paper Pack
- Doodlebug 6×6 Kraft in Color Paper Pad
- Doodlebug Hello Sunshine Spring Assortment Buttons
- Doodlebug Sprinkles Bright Glitter Assortment
- Doodlebug Sprinkles Spring Assortment
- Doodle Twine Swimming Pool
- The Twinery Marigold Stripe twine
- The Twinery Cappuccino Stripe twine
- Ranger White Accents
- Ribbon from Stash
- 1 inch Pom Pom
- Black Enamel dots
- Thin Brown Marker
- Think Pink Marker
- Sakura Black pen
- Pebbles Pearlescent Chalk
- Scotch Quick Dry Adhesive
- Hot Glue
- Detail Hot Glue Gun
- Silhouette Cameo
Dimensions (Bunny)
| Poplar Street Tulips SVG Kit (Egg-Shaped Container) | Size | Paper | Quantity |
| bottom.svg | 10.000 W x 10.287 H | Solid Card Stock | 1 |
| bottom_panels.svg | 10.000 W x 8.437 H | Patterned Card Stock | 1 |
| top.svg | 10.000 W x 7.661 H | Solid Card Stock | 1 |
| top_panels1.svg | 10.000 W x 3.390 H | Patterned Card Stock | 1 |
| top_panels2.svg | 10.000 W x 3.390 H | Patterned Card Stock | 1 |
| Christmas Open House SVG Kit (Snowman Folder) | |||
| body.svg | 8.986 W x 7.872 H | Solid Card Stock | 1 |
| panels_bottom.svg | 4.841 W x 4.788 H | Patterned Card Stock | 1 |
| panels_ top.svg | 4.198 W x 3.260 H | Patterned Card Stock | 1 |
| hat.svg | 6.148 W x 4.545 H | Solid Card Stock | 1 |
| Bunny Hop SVG Kit (Bunny Folder) | |||
| bunny1.svg | 6.447 W x 6.248 | Solid Card Stock | 1 |
| pink.svg | 3.486 W x 1.755 | Patterned Card Stock | 1 |
Dimensions (Chick)
| Poplar Street Tulips SVG Kit (Egg-Shaped Container Folder) | Size | Paper | Quantity |
| bottom.svg | 10.000 W x 10.287 H | Solid Card Stock | 1 |
| bottom_panels.svg | 10.000 W x 8.437 H | Patterned Card Stock | 1 |
| top.svg | 10.000 W x 7.661 H | Solid Card Stock | 1 |
| top_panels1.svg | 10.000 W x 3.390 H | Patterned Card Stock | 1 |
| top_panels2.svg | 10.000 W x 3.390 H | Patterned Card Stock | 1 |
| Christmas Open House SVG Kit (Snowman Folder) | |||
| body.svg | 8.986 W x 7.872 H | Solid Card Stock | 1 |
| panels_bottoms.svg | 4.841 W x 4.788 H | Patterned Card Stock | 1 |
| panels_ top.svg | 4.198 W x 3.260 H | Patterned Card Stock | 1 |
| hat.svg | 6.148 W x 4.545 H | Solid Card Stock | 2 |
| Egg Hunt SVG Kit (One-Piece Chick) | |||
| beak.svg | 1.000 W x 0.945 H | Patterned Card Stock | 1 |
Instructions
- Cut and assemble the egg-shaped container from Poplar Street Tulips SVG Kit, at the size on the spread sheet. Do not adhere the panels just yet. Note: If your making the bunny assemble the bunny ears and glue to the flaps on the top as your gluing the top together.
- To achieve a "cracked egg" look, use your scissors and cut the edge of the assembled top and bottom at an angle.
- Glue the panels for the top and bottom one at a time cutting to match your "cracked egg" look on the edges.
- Cut and assemble the snowman at the size on the spread sheet. Glue your top_panels.svg and your bottom_panels.svg into place. Do this for both the chick or bunny.
- Bring the hat.svg onto the virtual mat and delete the brim. You will not need this piece. Cut two hat.svgs and one octagon from the hat.svg.
- Cut the flaps off one long side of one hat.svg. Glue into octagon shape. Glue the flap side down to the inside of the egg top, making sure it stays in an octagon shape. This will be the "lid" of the chick or bunny.
- Glue the other hat.svg together gluing one side of the flaps to the inside bottom of the egg bottom. Glue the octagon onto the top. Your chick or bunny will be glued to the top of that.
- For the chick, glue the chick onto the hat.svg you have glued to the inside bottom of the egg. Cut, assemble and glue the beak.svg onto the front of your Chick. Adhere your black enamel dots above your beak. Draw your eyelashes on with your black pen. Using a needle draw your twine up through the top of the egg, loop it back down into the egg and tie off under the egg top. Cut your threads and unravel to give it the hair peeking through the top of the egg. Add a dab of hot glue to the inside to hold in place.
- For the bunny cut and assemble the bunny arms. Glue the bunny's body onto the hat.svg inside the egg bottom, then glue your arms into place. Assemble and glue the feet to the outside of the egg bottom.svg front. Glue your nose onto your bunny and adhere black enamel dots. Draw your bunny's eyelashes on with a black pen. Using Ranger White Accents make two small drops onto the front under the nose. This will be your teeth. Draw your mouth on using your black pen and add pearlescent chalk to make rosy cheeks.
- Embellish your egg bunny or egg chick. Don't forget the pom on the back of the egg for the bunny tail!


Design Tips

Sharalyn Morgan - Guest Designer
- Use either patterned paper or emboss folders to add texture and cuteness.
- Consider adding "stitch" lines to your Bunny or Chick for a whimsical look.
- Don't try to cut the edges of the egg to sharp or the panels will not fit properly.
- Use a pencil eraser side down, to push the shredded paper down around your bunny.
- Use a pin to make the gap for the teeth when you use the white accents.
I loved making these two cuties and just couldn't stop giggling. I hope they fill your Easter with lots of giggles too!