

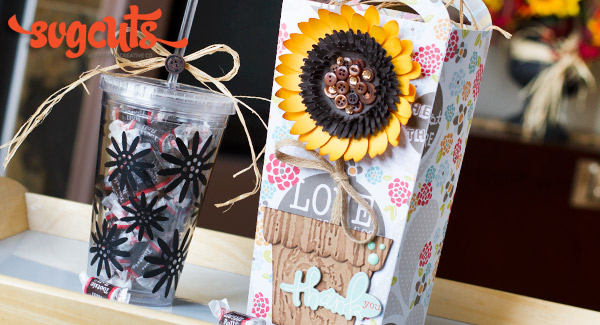


Ever want to make a super quick and simple Thank-you gift? I have the perfect project to help you with that! Say Thank-you to someone this Fall season with this cute Sunflower Gift Bag and coordinating tumbler.
SVG Collections Used
![]() 3D Mums and Fall Flowers SVG
3D Mums and Fall Flowers SVG
![]() Mother’s Day Flower Pot Card SVG Kit
Mother’s Day Flower Pot Card SVG Kit
![]() Gift Boxes SVG Kit
Gift Boxes SVG Kit
![]() Harvest Hill Farm SVG Collection
Harvest Hill Farm SVG Collection
Supplies Used
- Bazzill Basics Paper
- Pattern Paper – Hazel and Ruby (Gone Typo Collection Pack)
- Thank-you chipboard punch out by Studio G
- Black Vinyl
- Buttons
- Rhinestones
- Decorative Burlap Ribbon
- Raffia
- Brown ink pad
- Embossing Machine and wood pattern folder
- Scotch Quick-dry glue
- Hot Glue and Glue gun
- Scissors
- Plastic Tumbler
- Silhouette Cameo using SSDE
Dimensions
| 3D Mums and Fall Flowers SVG Kit (Sunflower) | ||
| centers.svg | 5.079" H x 11.300" W | Brown |
| petals.svg | 5.175" H x 11.300" W | Yellow |
| Mother's Day Flower Pot Card SVG Kit | ||
| pot.svg | 4.431" H x 11.262" W | Craft |
| Gift Boxes SVG Kit (Gift Bag) | ||
| bag_bottom.svg | 3.154" H x 8.800" W | Pattern Paper |
| bag1.svg | 11.372" H x 8.800" W | Pattern Paper |
| bag2.svg | 11.372" H x 8.800" W | Pattern Paper |
| Harvest Hill Farm SVG Collection | ||
| sunflower_bottom.svg | 2.154" H x 2.163" W | Black Vinyl |
| sunflower_top.svg | 0.812" H x 2.163" W | Black Vinyl |
| *read complete instructions for vinyl flowers* |
Instructions
Gift Bag
- Cut out all files as indicated in the first 3 SVG Collections in the chart above. NOTE: No sizing or alterations were done to these files.
- Assemble gift bag as per SVG Cuts directions.
- Do the same with the sunflower. To the center of the flower I glued buttons on top of one and other and added a few rhinestones.
- For some added cuteness, I created the sunflower’s stem using some decorative burlap ribbon. First make a bow, then glue one end of the ribbon underneath the head of the sunflower. Next attach the Sunflower to the top portion of the bag using hot glue. Slightly pull on the other end of the ribbon and add a little glue to keep the ribbon stretched forming the flower’s stem.
- Emboss the pot and ink as desired. Glue the assembled pot to the bottom of the bag covering up the end of the ribbon.
- Add some finishing touches by adding a Chipboard cutout or stamped sentiment.
Plastic Tumbler
- Begin by opening up the sunflower_top.svg from Harvest Hill Farm SVG Collection. Highlight the file and select release compound path. Delete the larger outer circle. Group the center circles left behind. Drag the circles to the center of the sunflower_bottom.svg and group together. NOTE: If this is too complicated create your own small circles using the basic shapes library/draw tools and add them to the center of the sunflower_bottom.svg.
- The largest flower I used was unaltered in size. You may want to create various other sizes as I did to use throughout the tumbler. To do this copy the original flower and resize it making smaller sizes. I used about 15 flowers to cover the tumbler.
- Cut flowers out of vinyl using your machines vinyl settings.
- Apply to tumbler.
Design Tips

Ilda Dias - SVGCuts Design Team Member
- This gift set can be easily modified to suit any event or season. Change the flower and sentiment to customize the gift even more. Match the tumbler’s design to the bag for a coordinated look.
Thank-you gifts don't have to be expensive. Something like this is simple and sweet… and made by you always comes from the heart.