

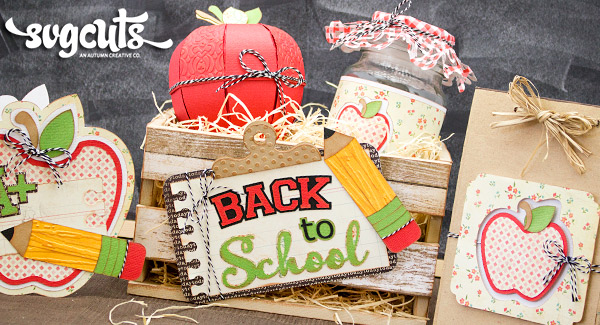


As summer break is coming to an end once again, everyone is wondering what to give that special teacher to wish them luck for the new school year. Why not create this special gift crate with matching card, notebook, apple and candy jar. It will surely start their year off well and show them just how much they are appreciated!
SVG Collections Used
![]() Caramel Apple Pie SVG Kit
Caramel Apple Pie SVG Kit
![]() School Days SVG Kit
School Days SVG Kit
![]() Miss Baker's Classroom SVG Kit
Miss Baker's Classroom SVG Kit
![]() Back to the Books SVG Kit
Back to the Books SVG Kit
![]() Doilies SVG Colllection
Doilies SVG Colllection
Supplies Used
- AC Cardstock
- Crate Paper Cardstock
- Twine
- Scotch Quick-dry glue
- Double Sided Tape
Dimensions
Crate
| CARAMEL APPLE PIE (CRATE) | ||
| crate board1.svg | 9.700"W x 3.685"H | Light Brown |
| crate board2.svg | 9.700"W x 3.685"H | Light Brown |
| crate board3.svg | 9.700"W x 3.685"H | Light Brown |
| crate board4.svg | 9.700"W x 3.685"H | Light Brown |
| crate bottom1.svg | 9.700"W x 4.946"H | Light Brown |
| crate bottom2.svg | 9.700"W x 6.647"H | Light Brown |
| crate face1.svg | 9.700"W x 5.594"H | Light Brown |
| crate face2.svg | 9.700"W x 5.594"H | Light Brown |
| crate optional.svg | 9.700"W x 6.080"H | Pattern Paper (woodgrain) |
| BASIC SHAPES (DECORATIVE SIDE PANELS) | ||
| square | 4.200'W0 x 4.350"H (cut 2) | Pattern Paper (woodgrain) |
| SCHOOL DAYS EXTRAS (CLIPBOARD) | ||
| board.svg | 6.000"W x 3.667"H | Pattern Paper (black) |
| middle.svg | 6.000"W x 2.820"H | Brown |
| paper.svg | 6.000"W x 3.278"H | Pattern Paper (notebook) |
| top.svg | 6.000"W x 1.383"H | Brown |
| SCHOOL DAYS EXTRAS (BACK TO SCHOOL CAPTION) | ||
| back bottom.svg | 5.500"W x 0.465"H | Black |
| back top.svg | 4.000"W x 1.298"H | Red |
| school bottom.svg | 4.000"W x 1.870"H | Pattern Paper |
| school top.svg | 4.000"W x 1.799"H | Green |
| to top.svg | 4.000"W x 1.081"H | Black |
| SCHOOL DAYS EXTRAS (PENCIL) | ||
| eraser.svg | 4.000"W x 0.586"H (cut 2) | Red |
| graphite.svg | 4.000"W x 0.413"H (cut 2) | Black |
| metal.svg | 4.000"W x 1.060"H (cut 2) | Green |
| pencil.svg | 4.000"W x 1.722"H (cut 2) | Yellow |
| wood.svg | 4.000"W x 0.474"H (cut 2) | Light Brown |
Apple
| MISS BAKER'S CLASSROOM (APPLE) | ||
| bottom.svg | 7.300:W x 7.253"H | Red |
| bottom panels.svg | 7.300:W x 9.735"H | Red |
| leaf panels.svg | 7.300"W x 1.614"H | Red |
| leaf stem.svg | 7.300"W x 2.267"H | Green |
| lid.svg | 7.300"W x 7.282"H | Patterened Paper |
| lid panels.svg | 7.300"W x 10.118"H | Red |
Card
| SCHOOL DAYS (APPLE CARD) | ||
| apple accent.svg | 5.000"W x 4.009"H | Red |
| black.svg | 5.000"W x 5.093"H | White |
| card base.svg | 10.000"W x 5.500"H | Pattern Paper |
| leaf.svg | 2.000"W x 1.498"H | Green |
| dark turquoise.svg | 5.000"W x 1.420"H | Pattern Paper (Black) |
| A+.svg | 2.000"W x 1.304"H | Green |
| notebook_paper.svg | 5.000"W x 1.825"H | Pattern Paper (Notebook) |
Label
| BACK TO THE BOOKS CARD FOR TEACHER (SINGLE CARD) | ||
| apple.svg | 2.500"W x 1.977"H | Patterned Paper |
| apple panel.svg | 2.700"W x 2.215"H | Red |
| card face panel.svg | 4.200"W x 3.714"H | Patterned Paper |
| card face panel.svg (only cut outer edge) | 4.200"W x 3.714"H | White |
| leaf.svg | 1.200"W x 0.654"H | Green |
| stem.svg | 1.000"W x 0.384"H | Brown |
Jar
| BACK TO THE BOOKS CARD FOR TEACHER (LABEL) | ||
| apple.svg | 1.665"W x 1.317"H | Patterned Paper |
| apple panel.svg | 1.798"W x 1.475"H | Red |
| card face panel.svg | 12.000"W x 2.772"H | Patterned Paper |
| card face panel.svg (only cut outer edge) | 12.570"W x 2.856"H | White |
| leaf.svg | 0.799"W x 0.436"H | Green |
| stem.svg | 0.666"W x 0.255"H | Brown |
| DOILIES SVG COLLECTION (JAR LID) | ||
| 3.svg | 6.000"W x 6.000"H | Red Checkered Paper |
Instructions
- Crate – Cut out and assemble the crate as per assembly tutorial. (No size alterations were done to any of the files used for the crate or the back to school sign). Add the two additional decorative square panels to the sides of the crate to give it a uniform look from all sides. Assemble the clipboard and add the caption on top. Emboss the yellow pencil pieces and then assemble both pencils as usual. Adhere one to the clipboard and set the other aside to use on the card. Emboss the "top" piece with an embossing folder of your choice before adhering it and finally add some twine around the clipboard before adhering it to the crate.
- Apple – Cut and assemble apple as per assembly tutorial. No size alterations were made. Before adhering the top panels, emboss every second one with a folder of your choice. Tie some twine around the top part of the apple.
- Card – Cut and assemble single card pieces as usual. Adhere the second pencil to the card and finish it off with some twine.
- Notebook Label – Resize and cut out the pieces according to chart above. Before cutting the second card face panel delete the centre apple to only cut outer edge (this is to provide a white backing for the label). Add string around the white face panel before adhering it to the back of the patterened face panel with foam dots. Adhere apple pieces to the centre before adhering label to a notebook of your choice.
- Jar Label – As with Notebook Label above, resize and cut out the pieces according to chart above. This time, before cutting either of the card face panels delete the centre apple pieces (as the size will be skewed when you resize the card face panels). To do this, release compound path on the first card face panel and resize the centre apple to 1.917"W x 1.957"H. Centre the apple on the label and then make compound path again. Now the apple cut-out will be the correct size to fit the other pieces. As above, the second card face panel will be adhered to the back of the first to create a white backing for the label. Once assembled, wrap around glass jar of your choice and adhere with double sided tape.
- Jar lid Doilie – Cut the doilie out according to size chart above (you may need to resize according to the size of your jar). Wrap it over the lid and tie it up with some twine.
Design Tips

Chantel - SVGCuts Design Team
- Before assembling anything, used a brown ink and rub it around all of the pieces. I love how it gives the whole project a uniform look and gives it a bit more of a rustic, country feel.
- I used a notebook which I had lying around the house but you could always make one yourself. Simply cut out two rectangles from chipboard and then cut some paper to similar size. Punch a couple of holes in the top before binding with twine or string of your choice.
- Add a tag to the jar – there is a cute tag file in the School Days kit which would look great in coordinating papers. It would also be practical to label the treats you put inside the jar (or perhaps a cookie mix recipe?)
This was a super easy project to make as only minor re-sizing to a few elements were required. For the most part, pieces were cut and assembled as usual but just used in different ways. I hope you enjoyed this project and that you will get a chance to make some or all of these cute elements for that special teacher.