


Hello everyone! I'm so excited and honored to be sharing my project with you today. I recently purchased some chipboard sheets for my Silhouette and thought this would be the perfect opportunity to try them out. The sheets are just a little thicker than cardstock, so I cut lots of layers to build up my pieces.
For me, deciding what to create is usually hardest part of the process. To help me get started, I focus on one thing that I love and then go from there. For this project, my focus was the adorable "bear bunny" from the Spring Bunnies collection. I've made so many bunny projects for Spring over the years, I liked that this guy was a little different. I think making the bear's face out of felt gives him a "warm and fuzzy" feel.
SVG Collections Used
![]() April Avenue SVG Collection
April Avenue SVG Collection
![]() Cotton Tail Village SVG Kit
Cotton Tail Village SVG Kit
![]() Spring Bunnies SVG Collection
Spring Bunnies SVG Collection
![]() Easter Morning Egg Hunt SVG Collection
Easter Morning Egg Hunt SVG Collection
![]() Free SVG File - 3/17/12 (Kite)
Free SVG File - 3/17/12 (Kite)
![]() Free SVG File - 2/25/12 (3D Bow)
Free SVG File - 2/25/12 (3D Bow)
![]() Free SVG File - 2/17/12 (Rainbow)
Free SVG File - 2/17/12 (Rainbow)
Dimensions
| April Avenue SVG Collection (bird) | Size | Paper Color |
| accent.svg (tail) | 0.500" W x 0.460'' H | Brown |
| accent.svg (wing, 1 orange, 2 chipboard for each bird) | 0.425" W x 0.425'' H | Orange & Chipboard |
| beak.svg | 0.160'' W x 0.100'' H | Brown |
| body.svg (cut 1 pink and 3 chipboard layers for each bird) | 1.585" W x 0.800'' H | Pink & Chipboard |
| April Avenue SVG Collection (label) | ||
| mid2.svg | 2.460'' W x 1.395'' H | Yellow |
| mid3.svg | 2.540'' W x 1.475'' H | White |
| mid4.svg | 2.875'' W x 1.645'' H | Blue |
| Easter Morning Egg Hunt | ||
| peeps_top.svg (cut 6 sets) | 2.555'' W x 1.340'' H | Yellow |
| peeps_bottom (cut 6 sets) | 2.555'' W x 0.340'' H | Brown |
| Spring Bunnies SVG Collection (Bear Bunny) | ||
| brown.svg (cut the ears in cardstock for pattern) | 2.305'' W x 2.680'' H | Brown felt |
| pink.svg (toy rabbit, cut 3 chipboard, 1 brown) | 1.490'' W x 2.390'' H | Brown & Chipboard |
| pink.svg (tummy, cut 2 chipboard, 1 pink) | 1.100'' W x 1.050'' H | Pink & Chipboard |
| pink.svg (nose, cut 2 chipboard) | 0.325'' W x 0.225'' H | Pink & Chipboard |
| white.svg (cut 12 chipboard, 1 cream) | 4.655'' W x 2.815'' H | Cream & Chipboard |
| Cotton Tail Village Kit (Mushroom House) | ||
| mushroom.svg (cut top of mushroom only, 12 pieces) | 1.070'' W x 4.130'' H | Cream (cardstock) |
| cap_panels.svg (cut all 12) | 0.820'' W x 2.815'' H | Pink |
| SVG Cuts_2012_02_17 (Rainbow) | ||
| green.svg (cut2) | 4.300'' W x 2.150'' H | Green / Chipboard |
| light blue.svg (clouds) cut 4 each | 3.285'' W x 2.130'' H | Lt. Blue / Chipboard |
| light blue.svg (merged rainbow and clouds) cut 4 | 8.160'' W x 4.925'' H | Lt. Blue / Chipboard |
| orange.svg (cut 6) | 5.730'' W x 2.865'' H | Pink / Chipboard |
| red.svg (cut 8) | 6.450'' W x 3.225'' H | Orange / Chipboard |
| yellow.svg (cut 4) | 5.015'' W x 2.505'' H | Yellow / Chipboard |
| SVG Cuts_2012_03_17 (Kite) | ||
| kite_bottom.svg | 1.795'' W x 4.454'' H | Brown cardstock |
| kite_top1.svg (delete bows) | 3.070'' W x 0.760'' H | Teal |
| kite_top2.svg | 2.650'' W x 0.760'' H | Cream floral |
| SVG Cuts_2012_02_25 (3D Bow) | ||
| bow.svg (cut 3) | 1.600'' W x 0.705'' H | 1 yellow and 2 orange |
| bow.svg (cut 1) | 1.785'' W x 0.785'' H | Brown floral |
Instructions
- Begin by covering the side of a round paper mache' box with patterned paper.
- Cover 4, 1 1/2" and 4, 1" chipboard circles with patterned paper. Make 4 wheels by layering the smaller circles onto the larger ones. Paint 4 chipboard flowers, allow to dry, then add a brad to the center of each. Glue the flowers to the center of the wheels and attach wheels to box.
- Use yellow cardstock and cut out 6 sets of peeps. (Optional: Trim off the bottom half of the bunnies). Cut and glue the bottom layer to the back of the peeps, in the eye and nose area. Add glitter to the front, if desired, then glue the bunnies around the side of the box to create a border.
- Cut a foam ball in half and cover with torn pieces of green paper. Glue the ball on top of the box. Then, adhere a pink row and a green row of crumpled up paper twine around the edge. Embellish the paper twine with pearl stickers, butterfly pins, or anything else you might have.
- Cut the 3 parts of the oval label (from the April Avenue collection) and glue them together. Attach title, heart and butterfly stickers, then adhere label to the front of the box.
- To build the rainbow, first resize the light blue file to 6.555" W x 5.630" H. Then merge the two clouds and rainbow piece together, the finished size should be 8.160" x 4.925". Cut 4 of these in chipboard and layer together with glue. Next, cut 4 left clouds and 4 right clouds in chipboard and layer together. Cut all the other rainbow colors in chipboard in the quantities indicated and layer together.
- Paint or cover the rainbow colors with patterned paper. Don't forget the light blue area of the merged chipboard piece, as well. Now glue the rainbow together, using the merged piece, as your base. Your rainbow should have a "stair step" effect, when you are done.
- Cover the two clouds with paper, then use foam dots to glue them onto the merged chipboard piece. Glue strips of chipboard, then matching paper to the sides of the clouds, to cover the gaps. If desired, add glitter to rainbow and clouds.
- To hold the rainbow in place, use two 8" wood dowels that have been covered with patterned paper. To insert them into the clouds, use a piercing tool or thin round file first, to make the hole at the bottom of each cloud, then gently push the dowels inside. Make sure to add glue before you insert the dowels. While you wait for the dowels to dry, glue three raindrop beads to the front of each cloud. Add small jump rings to four more beads and hot glue them at the back of the clouds, allowing them to dangle.
- Drill holes in the top of the box for the dowels. When everything on the rainbow is completely dry, cover the lower part of each dowel with glue and insert into the holes in the box.
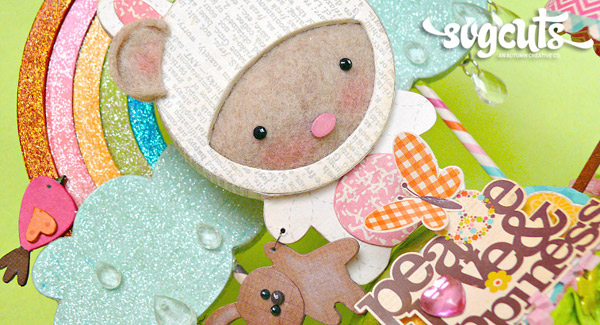
- Cut 12 chipboard layers for the bear's body without the face cut out and with the bear ears attached. Glue the layers together. Cut three more chipboard layers, this time with the face cut out. Glue the layers together, then trim off the arms, legs and bunny ears, leaving you with just the bears head. Cover the head and body with cream patterned paper. Next, cut a piece of felt a little larger than the face opening in the head and glue it to the back of the head. Cover the felt with a piece of cardstock, then carefully cut a small hole in the card. Use some batting to fill the pocketed area between the felt and cardstock.
- Glue the bear head to the body, then cover the sides of the bear with cream patterned paper. Cut the bear's ears out of cardstock then use them as a pattern, to trace, then cut out two felt ears. Glue the ears to the head then cover the sides of the ears with felt, as well. Cut the tummy area of the costume, using two layers of chipboard and patterned paper. Glue to the body. Hand draw, then cut pink ear inserts for the rabbit costume. Glue them in place, along with some rhinestone stickers for the eyes and a painted chipboard nose. Add a little pink chalk to the bear's cheeks and ears.
- Cut the toy rabbit out of three layers of chipboard and brown patterned paper, as indicated. A round shape is then hand drawn and cut in chipboard, to add a little dimension to the head. A painted chipboard nose and rhinestone stickers are added to the face for eyes. Use some wire to tie the toy rabbit to the bear's hand. Glue the rabbit to the top of the box.
- Cut the top part of the mushroom house (the roof) in cream cardstock. Then glue the pieces together, as if you were making the roof. When dry, cut the bottom 3 sections off, so the shape looks more like an umbrella. Next, cover the base of the umbrella with the cap panels. Use a scalloped border around the bottom edge and decorate with stickers, pearls and rhinestones. Use a painted wood dowel for the handle of the umbrella. Poke a hole in the top of the box then glue the handle of the umbrella in place.
- For each bird cut out 3 chipboard bodies, layer them together then cover with pink paper bird. Next, cut the wing, using 2 layers of chipboard and a layer of orange patterned paper. Ink or paint the sides of the pieces then glue them together. Cut the beak and tail from brown cardstock and glue onto the bird. Adhere one bird to the top of the left cloud and the other on top of the umbrella.
- Cut the top and bottom pieces for the kite and glue together. Cut the string off and replace with some thin wire. Embellish the kite with some pearl stickers. Then cut and piece together four 3d bows. Glue the bows in place on the kite. Attach the kite to the rainbow using foam glue dots.
Design Tips
- If you don't have chipboard sheets for your cutting machine, you can try using recycled cereal boxes or other thin cardboard.
Thanks for joining me today. Happy Spring!