

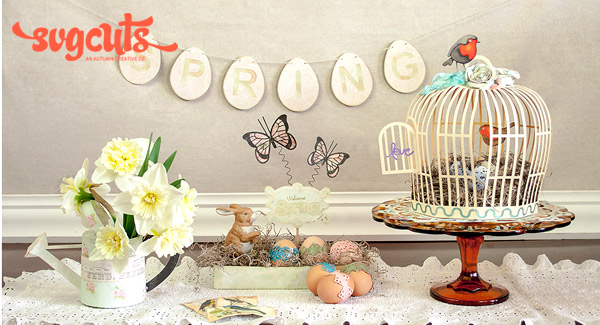


Transition your home from the icy cold colors of winter into the delicate, pale tones of spring with this table centerpiece. From the pretty watering can filled with bright, fragrant daffodils, to the happy robins inside their love nest, the centerpiece shows that the promise of new life is just around the corner. You are sure to welcome spring every time you pass this lovely scene.
SVG Collections Used
![]() Design Elements SVG Collection
Design Elements SVG Collection
![]() Robins Return SVG Collection
Robins Return SVG Collection
![]() Playful Parlour SVG Kit
Playful Parlour SVG Kit
![]() Doilies SVG Collection
Doilies SVG Collection
![]() Waterfall Cards SVG Kit
Waterfall Cards SVG Kit
![]() 3D Letters SVG Kit
3D Letters SVG Kit
![]() Mothers Garden SVG Kit
Mothers Garden SVG Kit
![]() Garden Nouveau SVG Kit
Garden Nouveau SVG Kit
![]() Free SVG File (Spring Caption – 3/3/2010)
Free SVG File (Spring Caption – 3/3/2010)
Supplies Used
- Pink Paislee's London Market collection
- WorldWin DoubleMates card stock
- Watermelon Taffy Trendy Twine
- Spectrum Noir markers
- Distress Ink (Tea Dye and Old Paper)
- More Mini Thoughts by My Thoughts Exactly stamps (Welcome)
- Perfect Pearls
- Spanish Moss
- Decorative brown eggs
- Plastic speckled eggs
- Cake plate
- Crinkle ribbon
- Enamel dots
- Ceramic bunny
- Craft wire (black – 20 gauge)
- Orange wood stick
- Freshly cut daffodils
- Dimensional adhesive dots
- Spool of thread
- Glue
- Brads
Dimensions
Birdcage
| Playful Parlour SVG Kit (Birdcage) | ||
| cage1.svg | 10" w | yellow |
| cage2.svg | 10" w | yellow |
| cage3.svg | 10" w | yellow |
| flower.svg (2) | 10" w | pattern paper |
| Design Elements SVG Collection | ||
| love.svg | 1.5" w | purple |
| Robin's Return SVG Collection | ||
| robin2_top.svg | 2.25" w | white |
| robin2_bottom.svg | 2.25" w | white |
| robin3_top.svg | 2.5" w | white |
| robin3_bottom.svg | 2.5" w | white |
| squiggle.svg (4) | 7" w | white |
| Doilies SVG Collection | ||
| 3.svg | 10.25" w | pattern paper |
Bunny Garden
| Mother's Garden SVG Kit (Glove Box) | ||
| box_bottom.svg | 11.4" w | pattern paper |
| Garden Nouveau SVG Kit (Butterfly Bi-Color) | ||
| butterfly_top.svg | 3" w | pattern paper |
| butterfly_bottom.svg | 3" w | pattern paper |
| butterfly_top.svg | 2.75" w | pattern paper |
| butterfly_bottom.svg | 2.75" w | pattern paper |
| Robin's Return SVG Collection | ||
| icing_top.svg | 4" w | pattern paper |
| icing_bottom.svg | 4" w | pattern paper |
| eyelet_lace_thin.svg (6) | 5.25" w | solid colors |
| eyelet_lace_wide.svg (6) | 5.25" w | solid colors |
| Spring Title (Freebie 3/3/10) | ||
| spring.svg | 2.75" w | pattern paper |
Watering Can
| Mother's Garden SVG Kit (Small Watering Can Container) | ||
| strip.svg | 11" w | pattern paper |
| spout_support.svg | 7.8" w | pattern paper |
| handle.svg | 7.8" w | pattern paper |
| can.svg | 11.4" w | pattern paper |
Banner
| Waterfall Cards SVG Kit (Easter Egg Card) | ||
| (top) background.svg (6) | 2.875" w | pattern paper |
| (bottom) background.svg (6) | 3" w | pattern paper |
| 3D Letters SVG Kit | ||
| s_face.svg | 2" h | pattern paper |
| p_face.svg | 2" h | pattern paper |
| r_face.svg | 2" h | pattern paper |
| i_face.svg | 2" h | pattern paper |
| n_face.svg | 2" h | pattern paper |
| g_face.svg | 2" h | pattern paper |
Instructions
- Starting with the birdcage, bring pieces to mat at original import sizes then cut out and assembly according to directions. Set aside and work on embellishments.
- Cut out the flower.svg, doily.svg, love.svg, squiggle.svg and robin.svg at the amount and sizes indicated above. Take the love.svg and adhere to door of cage. Take your four squiggle.svg cuts and dust with Perfect Pearls, after applying the glue pad on the top of the cut. Add glue to the bottom of the cut, being careful not to rub off the shine, and adhere the squiggle.svg cuts along the bottom of the cage. Make sure to line up each piece to give it a continuous look. When you get to the fourth piece, there will be some extra. Just cut as closely to the next piece, lining it up, as possible.
- Assemble your two robins. I used white paper and Spectrum Noir markers to give my robins more depth and realistic coloring. You can use any color card stock of your choice, if desired instead of coloring. Take the smaller (female) bird, glue to a toothpick along one leg (this hides the toothpick).
- Once your birds are dry, add Spanish moss to the inside of cage. Now place a few eggs in the nest, I used five in mine. Take the female bird pick you made and put her inside the birdcage watching over the eggs. Move on to your flowers.
- Roll your flowers as tightly or loosely as you want, glue end to underside. Spritz lightly with water and carefully bend the petals down until you get a pleasing rose shape. Dust with Perfect Pearls. Set aside to dry. Now take your crinkle ribbon and tie it around the handle of the birdcage. I made a double loop for fullness. Now it’s time to glue your male bird to the handle. Offset him a little so you can use the handle if need be. Your flowers should now be ready to attach to the top of the birdcage. Place a few enamel dots around the top and between the flowers. To finish off the birdcage arrangement, place the doily.svg on the cake plate, followed by the birdcage.
- With your first part of the arrangement complete, move to the Bunny Garden. Cut out the box_bottom.svg and assemble. Place enough Spanish moss inside to fill box. Place ceramic bunny in the moss. Cut out the butterfly.svg pieces, icing.svg and spring.svg title. Glue the icing_top.svg to the icing_bottom.svg together and then the spring.svg towards the bottom so you have room for your “Welcome” stamp. Adhere the “Welcome Spring” sign to a orange wood stick using dimension glue dots for a strong hold. Take craft wire and curl around pencil. The wires are 5.5” and 4.5” shown above with curls. With your butterfly pieces assembled, tape the wire onto their back. Glue both butterflies to sign using the dimension dots. Slide sign in the middle of hidden spool of thread.
- To make the egg wraps, you need to take two of the eyelet_lace_thin.svg and weld together. Make two copies for a total of three eyelet_lace_thin.svg wraps. Do the same to the eyelet_lace_wide.svg. You should now have six wraps (three of the two designs). Grab your decorative brown eggs and wrap the trim around. Glue ends together. There may be some overlap, cut if there is excess. Place a few in your box and some outside.
- Moving on to the watering can, cut the small watering can container pieces at original import sizes in coordinating papers. Before assembling, edge pieces with ink. Attach both handles with pastel brads. If using real flowers like I did, carefully glue a sandwich bag filled with just enough water to cover stems with double-sided tape to side of can. If baggie seems to fall down, take double-sided tape and glue the other side of bag to the underside of can. Arrange daffodils in watering can container. This piece of your décor is finished.
- For the banner to complete your project, you need to do some welding before cutting out. Bring the background.svg from the Waterfall Cards kit – Easter Egg to the mat at the (bottom) size above. Break apart and move the two holes from the bottom to the top of the egg. Make five copies for a total of six (bottom) background.svg cuts. Make six more copies and resize at the (top) background.svg as shown above. Bring all six face.svg cuts to the mat at the sizes above. Place one letter in each of the (top) background.svg cuts. When letter is centered in egg, weld the two pieces together to make one cut. When all letters are welded into (top), cut out all 12 pieces. Edge with inks. Adhere the top background.svg pieces with letter to the bottom background.svg pieces. String the banner with twine. Your banner is done.
- To complete your centerpiece, arrange your projects on a pretty lace doily or table runner and hang banner on wall behind table or move to the fireplace. Smile and admire every time you walk by.
Design Tips

Becki Wagner - Guest Designer
- Dust Perfect Pearls on accent cut pieces to give dimension and add a touch of glam.
- Use a heavier card stock for larger 3D pieces to give them stability.
- Lightly spritz water on your paper flowers to break down the fibers. This makes them easier to bend and manipulate the petals for a more realistic look.
- If you are afraid of using real flowers in your 3D paper projects, make your own out of paper with the 3D flowers SVG kit.
- Using ribbon, flowers, and/or the enamel dots is a great way to hide any imperfections or mistakes you may have made when assembling your 3D projects.
If I don't have time to decorate the whole house, I always try to get a centerpiece on the dining room table. It's a great way to showcase a holiday or change of season quickly to give your home a little extra pinch of happiness.
4 Responses to “Spring Centerpiece by Becki Wagner”