

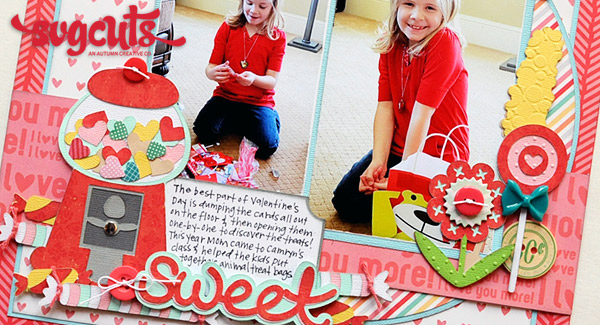


Scrapbook the love you have for a sweetheart in your life with bright candy colors and candy images from An Afternoon at Auntie Elaine’s SVG collection. The gumball machine on this page gets a Valentine’s Day treatment when it is filled up with hearts instead of gumballs.
SVG Collections Used
![]() An Afternoon at Auntie Elaine’s SVG Collection
An Afternoon at Auntie Elaine’s SVG Collection
![]() Attic Treasures SVG Kit
Attic Treasures SVG Kit
![]() Breezy Backyard Lever Cards SVG Kit
Breezy Backyard Lever Cards SVG Kit
Supplies Used
- Adhesive
- Foam Squares
- Solid and Patterned Papers
- Gray Ink Pad
- Pink and White Twine
- Enamel Arrow Stickers
- Red Buttons
- Silver Metal Dot or Brad
- Mini Paper Clip
- Wood & Chipboard Buttons
- Acrylic Dimensional Bow
- Caption Die Cut
- Heart Banner Die Cut
- Heart Die Cuts
- Label Sticker
- Circle Cutting Tool
- Embossing Machine
- Embossing Folders
- Journaling Pen
- Trimmer
- Scissors
Dimensions
| SCAL Library (Basic Shapes) | ||
| Circle | 8.8" W x 8.8" H | Stripe |
| Circle | 9" W x 9" H | Blue |
| Square | 10.5" W x 10.5" H | Heart Pattern |
| Square | 10.75" W x 10.75" H | Blue |
| Attic Treasures SVG Kit (12 X 12 Scrapbook Page) | ||
| raffle_ticket_bottom.svg | 3.784" W x 2.267" H | White |
| Object > Shadow Layer > 1.0 | Gray | |
| Breezy Backyard Lever Cards SVG Kit (Sweet Cupcake Card) | ||
| sweet_bottom.svg | 4.145" W x 1.464" H | Blue |
| sweet_top.svg | 3.997" W x 1.262" H | Red |
| sweet_top.svg | 3.997" W x 1.262" H | Pink |
| An Afternoon at Auntie Elaine's SVG Collection | ||
| candies_bottom.svg | 3.753" W x 0.631" H | Blue (2) |
| candies_middle.svg | 3.753" W x 0.631" H | Pink (2) |
| candies_top.svg | 3.753" W x 0.631" H | White (2) |
| candy_bottom.svg | 1.623" W x 0.519" H | Yellow (3) |
| candy_top.svg | 1.623" W x 0.519" H | Red (3) |
| flower1_bot.svg | 2.061" W x 2.570" H | Blue |
| flower1_mid.svg | 2.061" W x 2.570" H | Red |
| flower1_top.svg | 2.061" W x 1.117" H | Green |
| gumball_bottom.svg | 3.078" W x 2.525" H | Dark Gray |
| gumball_mid1.svg | 3.078" W x 4.869" H | White |
| gumball_mid2.svg | 3.078" W x 4.869" H | Blue |
| gumball_mid3.svg | 3.078" W x 2.525" H | Light Gray |
| gumball_top.svg | 3.078" W x 4.869" H | Red |
| heartpop_top.svg | 0.613" W x 0.490" H | Red (4) |
| heartpop_top.svg | 0.613" W x 0.490" H | Yellow (4) |
| heartpop_top.svg | 0.613" W x 0.490" H | Blue (4) |
| heartpop_top.svg | 0.613" W x 0.490" H | Pink (4) |
| heartpop_top.svg | 0.613" W x 0.490" H | Tan (4) |
| lollipop_bot.svg | 1.457" W x 3.439" H | White |
| lollipop_bot.svg | 1.457" W x 3.439" H | Pink |
| lollipop_top.svg | 1.457" W x 3.439" H | Red |
| rock_bot.svg | 0.952" W x 5.339" H | Tan |
| rock_top.svg | 0.961" W x 2.630" H | Yellow |
Instructions
Ink all edges of papers and die cut pieces with gray ink, if desired.
- Use 12” x 12” red patterned paper as background. Cut a 10.75” square from blue cardstock. Center and adhere to background.
- Cut a 10.5” square from heart patterned paper and adhere to blue square. In the top left corner adhere a pre-printed heart banner die cut, caption die cut, and enamel arrow sticker as shown.
- Using SCAL Basic Shapes or a circle cutting tool, cut a 9” circle from blue cardstock. Adhere to page approximately 1.5” from the top edge and 0.25” from the left edge of the background paper.
- Using SCAL Basic Shapes or a circle cutting tool, but an 8.8” circle from striped patterned paper. Adhere to blue cardstock circle.
- Cut a 12” x 3” strip of pink text patterned paper. Adhere 2.25” up from the bottom edge of the background paper.
- Mat a 4” x 6” vertical photo with blue cardstock leaving a 3/8” edge all the way around. Adhere photo to page 2.5” from the top edge and 1.5” from the right edge of the background paper.
- Write the date on a label sticker and adhere to the top right corner of the 4” x 6” photo. Add a mini paper clip to the top of the photo. Adhere an enamel arrow sticker below the label sticker.
- Mat a 3.5” x 5” vertical photo with blue cardstock leaving a 1/16” edge all the way around. Adhere the photo to the left of the 4” x 6” photo so that the top edge is ¾” down from the top edge of the 4” x 6” photo, overlapping them slightly.
- Cut the ticket shape from the Attic Treasures SVG Kit. Using SCAL select “Object > Shadow Layer > 1.0” to create a shadow. Or use the Offset tool if you are using a Silhouette Cameo to create a shadow for the ticket shape. Cut shadow from gray cardstock.
- Layer the ticket and shadow layer together. Adhere below the photo on the left overlapping both of the photos slightly.
- Locate all of the pieces of the gumball machine, as well as the tiny hearts in multiple colors (heartpop_top) cut from the An Afternoon at Auntie Elaine’s SVG collection. Locate the white layer of the gumball machine and the hearts, set the rest of the pieces aside for now. Adhere the hearts to the “bowl” of the white gumball machine in a random pattern. Add mini heart pattern die cuts in along with the tiny hearts.
- Finish layering and adhering the other layers of the gumball machine. Add a metal dot or silver brad to the knob of the gumball machine. Add white string to a red button and adhere to the top of the gumball machine. Adhere to page to the left of the ticket journal block.
- Locate and assemble all of the pieces for the long and short candies. Cut a length of pink string and tie a knot on each end of the longer candies. Cut one of the longer candies in half. Tuck and adhere candies around gumball machine and journal block, as shown.
- Cut layers for the “Sweet” title from the Breezy Backyard Lever Cards SVG Kit. Layer the red word on top of the pink word, and adhere them together so that they are slightly offset from one another. Adhere to the blue shadow. Add title to page below the journal block with foam dots.
- Use white string to tie a bow in the holes of a red button. Adhere to the left of the title, tucking it underneath the letter “s” slightly.
- Locate the pieces for the rock candy swizzle stick. Emboss the candy layer and then layer the pieces together. Adhere vertically and at a slight angle to the right of the 4” x 6” photo.
- Locate the pieces for the lollipop. Use scissors to trim the stick off of the pink and red layers. Emboss the pink layer. Use the white layer as the bottom layer. Emboss the pink layer and adhere to the white bottom layer. Adhere the red layer on top. Add an acrylic bow and adhere to the page to the right of the rock candy swizzle stick.
- Locate the pieces for the flower. Emboss the green layer. Layer together. Layer a chipboard button and a red button (tied with white string) to the flower center. Adhere flower to the left of the lollipop at the bottom of the 4” x 6” photo. Adhere a wood button behind the sucker to the right of the bottom corner of the photo.
Design Tips

Jana Eubank - SVGCuts Design Team Member
- Change up the look of an image by replacing the traditional colors or shapes with seasonal choices. For example, the gumball machine on this page is filled with hearts for Valentine’s Day.
- Look for circular areas in your die cut shapes. These are great places to add circular embellishments like buttons, brads, enamel dots, etc. for more dimension.
- Look through your craft stash and mix pre-printed die cuts in with your digitally cut shape. Here I used a mixture of solid cardstock hearts cut with my machine and patterned die cut hearts inside of the gumball machine.
- Create a journal block from a basic shape. Add a shadow layer with the shadow or offset tool of your program to give it more presence on your project.
Candy images are so much fun and versatile for anytime of year. Try creating a candy page with pastel colors for Easter, or maybe try black, orange, green and purple for Halloween. Or pull out the red, white, and green for Christmas. The possibilities are endless!