

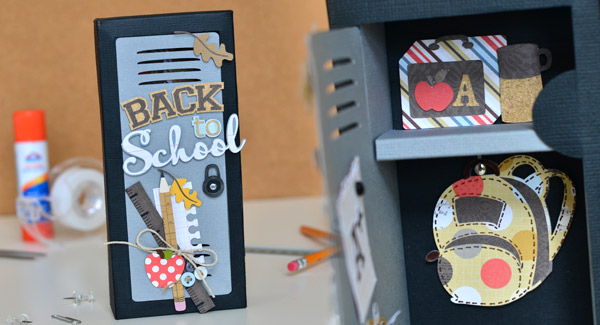


How fun would it be to give your kids some new school supplies in a locker shaped box? How cool would your kid feel to use a locker box as a pencil case? I designed a 3D locker box using the letter "I" from the 3D Letters SVG Kit, and combining it with one of the doors from Classic Advent Calendar SVG Kit.
SVG Collections Used
![]() 3D Letters SVG Kit
3D Letters SVG Kit
![]() Classic Christmas Advent Calendar
Classic Christmas Advent Calendar
![]() Back to School SVG Collection
Back to School SVG Collection
![]() School Days SVG Collection
School Days SVG Collection
Supplies Used
- AC cardstock
- Patterned Paper – Echo Park Note to Self Collection
- Twine
- Buttons
- Brads
- Scotch Quick-Dry Adhesive
- Double sided foam tape
Dimensions
Locker Base (Note: Read instructions before cutting)
| 3D Letters SVG Kit - Letter I | ||
| I1.svg | 22.0" wide by 11.2" high | black |
| Classic Christmas Advent Calendar | ||
| face.svg | 35.0" wide | black |
| interior_boxes1.svg | 35.0" wide | black |
| Back to School SVG Collection | ||
| locker_mid.svg | 2.60" wide by 6.750" high | (see instructions) |
| SCAL Basic Shapes (locker divider) | grey | |
| horizontal rectangle.svg | 3.75" wide by 2.55" high | grey |
Embellishments
| Back to School SVG Collection | ||
| leaf_top.svg | 0.80" wide, 0.90" wide | light brown, yellow |
| leaf_bottom.svg | 0.80" wide, 0.90" wide | dark brown |
| p1.svg | 0.275" wide | camel patterned paper |
| p2.svg | 0.275" wide | cream patterned paper |
| p3.svg | 0.275" wide | dark grey |
| p4.svg | 0.275" wide | mauve |
| lock_top.svg | 0.56" wide | dark grey |
| lock_bot.svg | 0.56" wide | black |
| locker_mid.svg | 2.60" wide by 6.750" high (cut 2) | grey |
| backpack_top.svg | 2.20" wide | polkadot patterned paper |
| backpack_bottom.svg | 2.20" wide | dark brown patterned paper |
| books_top.svg | 1.80" wide | beige patterned paper |
| books_mid1.svg | 1.80" wide | light blue patterned paper |
| books_mid2.svg | 1.80" wide | camel patterned paper |
| books_bottom.svg | 1.80" wide | white patterned paper |
| lunchbox_red.svg | 1.50" wide | stripe patterned paper |
| lunchbox_white.svg | 1.50" wide | dark brown patterned paper |
| lunchbox_green.svg | 1.50" wide | red patterned paper/cork patterned paper |
| thermos_top.svg | 0.75" wide | dark brown patterned paper |
| thermos_bot.svg | 0.75" wide | cork patterned paper |
| ruler_top.svg | 3.85" wide | dark brown patterned paper |
| ruler_bottom.svg | 3.85" wide | black |
| School Days SVG Collection - Extras | ||
| A+ | ||
| top.svg | 0.875" wide | dark brown patterned paper |
| Apple | ||
| leaf.svg | 1.075" wide | moss green/brown (cut stem) |
| apple.svg | 1.075" wide | red polkadot patterned paper |
| Back to School Caption | ||
| back_top.svg | 3.35" wide | dark brown patterned paper |
| back_bottom.svg | 3.35" wide | cork patterned paper |
| to_bottom.svg | 3.35" wide | light blue patterned paper |
| school_top.svg | 3.35" wide | white patterned paper |
| school_bottom.svg | 3.35" wide | blue patterned paper |
| Clipboard | ||
| middle.svg | 1.80" wide | grey patterned paper |
| board.svg | 1.80" wide | cork patterned paper |
| Notebook Paper | ||
| 2.svg | 1.00" wide | white grid paper |
| 4.svg | 1.65" wide | white grid paper |
Instructions
- Open i1.svg, uncheck ‘keep proportion’ and resize. Break apart and regroup into separate elements. You should have two that have flaps, and two that are plain rectangle. Select the rectangle, uncheck ‘keep proportion’ and resize the width only to 1.50” wide. Do the same for the other rectangle as well. You may cut only the rectangles.
- On the same mat, open face.svg. Resize. It will be very big (you will need to zoom out so you can see door 11). Break apart, and only select door 11 lines and regroup. You may now delete the rest of this file.
- Bring this door 11 to the middle of the letter I. (diagram1)
- Open locker_mid.svg. Uncheck ‘keep proportion’ and resize. Bring this on top of the door on the locker. (diagram 2) Break apart locker_mid.svg and delete the border. You should be left with only the openings of the locker. (diagram 3) Cut.
- On a clean mat, open interior_boxes1.svg. Resize. Again, this will be very big – make sure you zoom out to see the box 11. Break apart, and select only box 11. Regroup. You may now delete the rest of the file. This strip should now measure 20.166” wide by 3.971” high. Uncheck the ‘keep proportions’ and change the height only to 2.50” high. Notice that this file is larger than the mat. That is okay (in this case). Make a copy of this, and align both on the mat in such way that they will overlap when cut out. (diagram 4) Cut. Adhere the pieces together.
- Assemble the locker, and add in the divider. Cut the rectangle from SCAL basic library. You will need to score at 1.50”, 1.75”, 3.25”, 3.50” from the end. Fold and glue together the last flap to the other end. Glue one of the narrow side onto the locker. This allows the divider to be folded down.
- Embellish as needed. (You will need to cut 2 locker pieces, which will form the outside and inside of the locker)


Design Tips

Thienly - SVGCuts Design Team Artist
- Think about who the recipient is. Is it a boy or a girl? Is it for entering Grade 1 or Grade 7? What are their hobbies? These would determine what kind of papers you should use. You can even customize the locker door by their favorite color, or even add some objects that is associated with them. For my project, I used the paper collection from Echo Park – Note to Self, which is more trendy and cool. An older child would probably appreciate this more than a younger kid. I’ve also always stressed about this, but if you can pick a paper collection that you like and stick to that for all the elements (plain colored paper that matches your collection colors are fine), your project will look more uniform.
- Vintage or modern locker? I aimed my project to be a modern locker, but if you want the vintage look, you can use distressed papers, less vibrant colors, and you may ink the edges.
- When you are breaking apart and regrouping the files, if you are comfortable – you may delete all the score marks. I did this and scored it with my scoring board. The end result gives it a cleaner look.
- You can take a pen and make your own custom additions to your cuts. For example, I added in extra lines to the ruler, added some lines where the pencil meets eraser, and I also added some stitch lines to the backpack.
- You can add some brads and buttons to add interest and dimension.
- You can layer foam tapes to bring some elements out even more. For example, inside the locker, I added an extra layer of foam tape behind the thermos, compared to the lunchbox. This allows the thermos to appear closer. The divider in the middle folds down to allow taller things to fit inside the box. That means there’s plenty of room to fit gift cards, and some school supplies. The box inside measures 6.75” tall by 2.50” wide, which is tall enough for pens, even pencils (without eraser) when placed diagonally.
This project is simple to make, and so fun to customize! I hope that I’ve inspired you and that you'll give it a try!
4 Responses to “Back to School Locker Gift Box by Thienly Azim”