

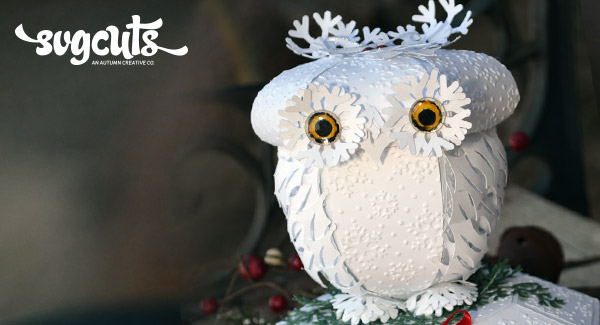

This winter owl is sure to impress this year.This snow owl sits atop a soap box waiting for you to open the box and find a treasure inside. There is something about this face that makes the person looking at it say, look at that and is that paper?
SVG Collections Used
![]() Acorn Autumn SVG Kit
Acorn Autumn SVG Kit
![]() December Doorhangers SVG Kit
December Doorhangers SVG Kit
![]() 3D Wintergreens SVG Kit
3D Wintergreens SVG Kit
![]() Honeybee Tea SVG Kit
Honeybee Tea SVG Kit
![]() Shaped Christmas Cards Collection
Shaped Christmas Cards Collection
Supplies Used
- My Minds Eye Sliegh Bells Ring Collection
- American Craft Card Stock
- Bazzill Card Stock
- My Minds Eye Enamuel Dots Lost and Found Collection
- Tim Holtz Snowflake Pattern Emboss Folder
- Copic Markers - Y13 Lemon Yellow, YR23 Yellow Ochre, 100 Black
- Epiphany Crafts 14 Circle Epoxy 2
- Ribbon
- Scotch Quick Dry Adhesive
- Hot Glue
- Detail Glue Gun
Dimensions
| Autumn Acorn SVG Kit (Acorn Folder) | QTY | ||
| acorn.svg | 10.761 W x 10.761 H | Solid Card Stock | 1 |
| bottom_panels.svg | 6.106 W x 8.316 H | Solid Card Stock | 1 |
| lid_panels.svg | 7.624 W x 4.729 H | Solid Card Stock | 1 |
| December Door Hangers SVG Kit (Penguin Folder) | |||
| white.svg | 1.297 W x 1.376 H | Solid Card Stock | 18 |
| Shaped Christmas Cards SVG Kit (Holly Folder) | |||
| green_leaf.svg (A2) | 0.913 W x 2.492 H | Solid Card Stock | 10 |
| green_leaf.svg (A2) | 0.719 W x 1.962 H | Solid Card Stock | 85 |
| 3d Wintergreens SVG kit ( Evergreen-Ferny Folder) | |||
| evergreen_ferny.svg | 30555 W x 4.281 H | Solid Card Stock | 8 |
| Honeybee Tea SVG Kit (Soap Box Folder) | |||
| lid.svg | 11.4 W x 11.4 H | Solid Card Stock | 1 |
| lid_panels.svg | 3.5 W x 2.635 H | Solid Card Stock | 1 |
| bottom.svg | 9.4 W x 11.4 | patterned Card Stock | 1 |
| base.svg | 10.2 W x 9.698 H | Solid Card Stock | 1 |
Instructions
- Choose the color you would like your owl and cut the Acorn from Acorn Autumn SVG Kit according to size on excel sheet.
- Open the accents for acorn lid,delete the stems and the piece the stems are inserted into. Emboss the accents with the embossing folder and glue onto Acorn. Glue the lid and bottom of Acorn together with hot glue.
- Open the White svg file from December Door hangers SVG Kit and ungroup, you will be using just the snowflake from this file. Glue three snowflakes together for strength. Glue two more snowflakes on top of the three angled so that it looks like fringe. Shape the snowflakes for the feet into a cupped down position. These will be the feet for the owl. Hot Glue those to the bottom front of the owl, fairly close together.
- Use a pencil or a stylus shape all holly leaves in a curved up position. Begin gluing larger holly leaves on the bottom back middle portion of the Acorn. Angle the holly leaves as you glue in the shape of a birds tail. Glue 4 rows like this, then on three of the holly leaves about the middle portion of the tail, glue an extra holly leave on each one. This is to give the look of long tail feathers.
- Use the Small Holly leaves as your body feathers. Glue sides at an angle toward the back of the owl for the illusion of wings. Sides of the owl feathers on done straight down starting at the bottom of the Acorn and work toward the top. On the back of the owl, glue the small holy leave straight from the bottom toward the top, add a few angled small holy leaves to the sides.
- Glue two Snowflakes together in an angled position as you would a flower. Use the Y13 Copic Marker and color in the center of your snowflake. Around the inside edge of the Y13 draw a circle with YR23. Go back over the circle with Y13 while it is still wet to blend the colors. Do this to both snowflake eyes. Just around the edge of the of the outer circle lightly draw a black edge. Use a regular hole punch and punch two small black circles for the pupil. Adhere to the center and use Glossy accents to affix the Epoxy over the center of each snowflake. Hot glue the eyes in place.
- Shape 4 snowflakes into a cup shape. Hot glue the snowflakes that are to be the ears in place at an angle with one in back of the other. I angled mine for interest.
- Cut a small Holly leaf in half and hot glue between the eyes pinching the sides a bit to give the beak look. Use one of the snowflakes and cut with scissors the tips off. curve them a bit and glue about 4 around the top of the beak to give the ruffled feather look.
- Glue 4 holly leaves onto the top of the head between the ears and add the Enamel dots for berries. Glue on a bow.
- Cut the soap box lid svg and emboss your accents with a snowflake pattern emboss folder. Glue together.
- Cut the bottom box svg from patterned paper and glue it together. Ink your edges to give a polished look.
- Put the lid on the box and glue the ferny greens cut at the size on the on excel sheet to the top of the box. Lay one long piece of ferny green on the long top side of the top of the box and the same on the other side. Glue two med ferny greens in the middle of that on both short sides. Now hot glue your owl body onto the top of the box. Try to be careful with the amount of glue you use. You want the owl to be secure, but not so that you can't hide any glue with extra ferny greens. Fill in areas that need it with med and small ferny green pieces. This is so the owl looks like he is sitting on a nest or a tree branch. Some of the fill in pieces can be curved up a bit with your pencils or stylus.
- Glue a bow onto the front or desired embellishments.
Design Tips

Sharalyn Morgan - Guest Designer
- Keep the owl one or two colors. This makes the owl become the focus and not the paper you used.
- When choosing an embossing folder think about it adding texture and setting to the owl.
- Using a mouse pad under your paper when shaping with a stylus helps the paper to shape easier.
- Use Glossy accents to adhere the eyes as the epoxy sometimes comes off with heat and you wouldn't want your owl to be winking when the gift is opened.
Watching this owl come to life made me smile and will be sure to bring a smile to the recipient as well. Hoo every you give this to will love it! I hope this encouraged you to not be afraid to try something with more detail. I know you can do it!