

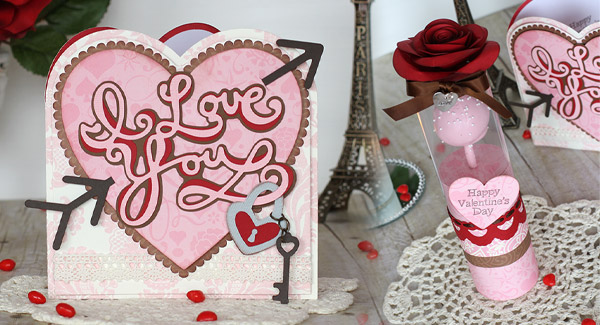


Let someone know you love them this Valentine’s Day by making them this beautiful card and coordinating cake pop treat tube. They will love you forever!
SVG Collections Used
![]() 24 Valentines SVG Kit
24 Valentines SVG Kit
![]() Crush On You Boxes SVG Kit
Crush On You Boxes SVG Kit
![]() Parkside Row SVG Kit
Parkside Row SVG Kit
![]() Smooth and Swirly Word Art SVG Collection
Smooth and Swirly Word Art SVG Collection
![]() Stars and Stripes SVG Kit
Stars and Stripes SVG Kit
![]() Sweets For My Sweet SVG Kit
Sweets For My Sweet SVG Kit
Supplies Used
- Bazzill Basics Paper
- Anna Griffin Cardstock –Valentina Collection
- Clear Acetate Sheet
- Brown and Black ink pads
- Stamp – Craftin Desert Divas (Happy Celebrations)
- Ribbon
- Metal Chain
- Heart Charm
- Foam tape
- Scissors
- Scotch Quick-dry glue
- Scotch ATG gun and glue
- Heat glue gun
- Cake pop
Dimensions
| 24 Valentines SVG Kit (Lock and Key) | Size | Paper Color |
| key.svg | 0.504" H x 1.548" W | Dark Brown (cut3) |
| keyhole.svg | 0.705" H x 1.548" W | Red |
| lock.svg | 1.645" H x 1.548" W | Grey (cut3) |
| Crush On You Boxes SVG Kit | ||
| rose.svg | 5.550" H x 7.222" W | Red |
| Parkside Row SVG Kit (Love You to the Moon Card) | ||
| arrow.svg | 1.249" H x 6.862" W | Dark Brown (cut2) |
| Smooth and Swirly Word Art SVG Collection (Word Art - I Love You - Plain) | ||
| love_you_background.svg | 3.253" H x 4.493" W | Brown |
| love_you_bottom.svg | 3.139" H x 4.493" W | Red |
| love_you_top.svg | 3.139" H x 4.493" W | Light Pink |
| Stars and Stripes SVG Kit (Firecraker) | ||
| bottom.svg | 6.963" H x 6.797" W | Pink Pattern |
| bottom.svg (acetate tube top) *see instructions | 4.914" H x 6.916" W | Clear Acetate |
| lid.svg | 3.823" H x 6.797" W | Pink Pattern |
| Sweets For My Sweet SVG Kit (Cupid Card) | ||
| card_base.svg | 5.747" H x 11.400" W | White and Pink Damask |
| heart_bottom.svg | 5.067" H x 5.400" W | Brown Pattern |
| heart_top.svg | 4.706" H x 5.200" W | Pink Pattern |
| interior.svg | 5.447" H x 5.400" W | White and Pink Damask |
| small_heart.svg | 1.837" H x 1.965" W | Pink Pattern |
| Free File (Crochet Trim - 02.08.13) - Click To Download | ||
| crochet_medium.svg | 0.911" H x 6.986" W | Red |
| Basic Shapes Library | ||
| rectangle | 1.791" H x 6.841" W | Brown Pattern |
| rectangle | 1.144" H x 6.841" W | Pink and White Pattern |
| circle | 0.175" | Pink Pattern |
Instructions
Card
- Begin by opening up the listed files for the Cupid Card from the Sweets for my Sweet SVG Kit. No sizing required.
- Before cutting out the heart_top.svg I added two small cut lines to the heart by using the draw tool. These will become slits for the arrow to slide through. See screenshot image.
- Cut out the card pieces. Note that I used the interior.svg on the front of the card. Make sure you also cut out another interior.svg in plain white for the interior of the card to add a greeting if you like. Set pieces aside.
- Next open up the I love you, plain word art from the Smooth and Swirly SVG Collection. Resize. Cut and glue the top 2 layers together, then set aside.
- For the arrow, open up the file from Parkside Row House SVG Kit as indicated above. Resize and cut out 2. Glue them together. With a pair of scissors cut the arrow in the half and set it aside.
- For the last piece of the card open up the lock and key from 24 Valentines SVG Kit. Resize and cut. Glue the key and lock layers together creating strong chipboard like pieces. Glue keyhole.svg layer to center of the lock. To attach the key to the lock I used a wide link chain and slid the top of the key through the ring that I gently pried open and then gently closed it back into position. Repeat the same steps to attach the chain to the lock.
- Time to assemble the card. Begin by gluing a lace trim to the interior.svg layer of the card. Attach this layer to the top of the card base by using some foam tape. Next, glue on the scalloped heart. To the top heart slide and glue the arrow pieces through the slits created in step 2 (add glue to the back of the heart to secure the arrow in place). Use foam tape to attach the top heart to the card. Now center and glue the love_you_background.svg layer to the top heart. Before gluing down the top I love you layers, slide the lock through the bottom swirl or the word art and hook it in place. Glue the I love you layers together leaving the lock and key free to dangle. Stamp the inside of the card with a sentiment if you like and that’s it, you are done the card!
Cake Pop Treat Tube
- Open up the files for the firecracker from the Stars and Stripes SVG Kit. Ungroup and delete the stars and the fuse. Regroup the body of the firecracker with its cut lines. Resize. Cut and assemble. This piece will become the bottom base of the tube box.
- To the lid.svg, resize and ungroup the 3 pieces. Regroup the strip of the lid with its cut lines. Delete the triangle from the larger circle. Next add to the center of both circles a 0.175” circle. Group together. Cut out and assemble lid, ensure you align the center circles together when you gluing the top of the lid. Allow lid to completely dry and then slide it onto the bottom part of box made in step 1.
- Repeat step1 to create the clear acetate tube top. NOTE: The size is slightly larger. To assemble the tube I used my Scotch ATG gun and attached the strip of glue right to the edge of the tab. It holds together instantly, so ensure you line it up properly! Finish the tube by gluing on the top the same way adding a glue strip along the edge of the top acetate circle. NOTE: Because this is a clear tube, you may not like the look of all the top tabs and glue showing through like I did. To solve for this I glued another circle the same size as the clear one just cut out of cardstock. I also used ribbon and a bow to finish and hide the seam. You may now at this point also want to resize, cut out, assemble and add the rose from the Crush on You Boxes SVG kit to the top of the lid. Set aside.
- NOTE: This next step is import as it will create a lip that will keep the clear acetate tube from sliding all the way down. Start by cutting out the 2 rectangular shapes to create the trim around the bottom tube. Use the bottom of the lid as a guide to where you should start gluing. Glue first the larger piece followed by the smaller one on top. NOTE: Try keeping the seams in one spot, this will then become the back of the tube and therefore not be seen. I used the seam of the bottom of the firecracker as my glue starting point.
- To finish off the lip, I weaved some brown ribbon to the top holes of the crochet trim and then glued it to the tube.
- Insert the cake pop through the lid opening and slide the clear tube top on.
- Finish off by stamping a sentiment of your choice to the small heart cut out and add it to the front of the bottom of the acetate tube using foam tape.
- Voila! Your labor of love is complete!
Design Tips

Ilda Dias - SVGCuts Design Team Member
- When working with acetate use Scotch ATG glue and gun or similar glue. The acetate naturally wants to spring back into a flat position so using liquid glue may be quite messy and frustrating to hold in place while it dries.
- Cake pops come in all shapes and sizes, so make sure that the ones you get fit the measurements for this tube. The cake pop I used in this project came from Starbucks and looks like it is a standard 4” lollipop stick. If you are making your own, ensure that the diameter of the cake pop ball is less than 2 inches. You can always resize the box to fit something different.
- For some added treats you can fill the base of the tube with some Hershey’s Kisses, Jelly Beans or cinnamon hearts. This will also give the tube some weight and balance.
- Use coordinating Valentine papers on both projects to create a gift set look.
- Don’t want to give a cake pop? No problem, lots of possibilities! Skip making the lid so that you have just an open tube to fill with treats. Just remember to somehow secure the lid. I would use some fun washi tape to keep the lid from popping off and spilling out the treats!
Hope this project has inspired you to say I love you to someone special this Valentine's Day!