

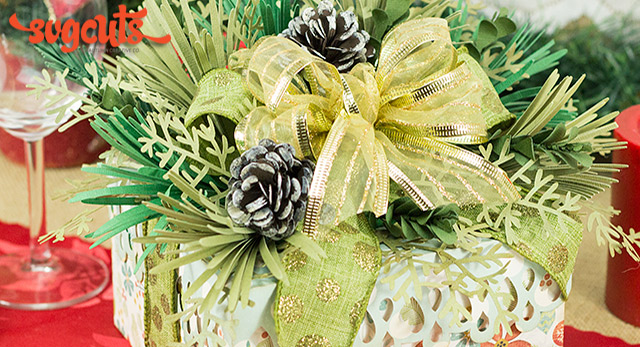


When hosting a Christmas party, lunch or dinner this year, why not spruce up your table with this gift box bouquet centerpiece made entirely out of paper! You'll be the talk of the town for weeks to come!
SVG Collections Used
![]() Christmas Gift Bags and Boxes SVG Kit
Christmas Gift Bags and Boxes SVG Kit
![]() 3D Wintergreens SVG Kit
3D Wintergreens SVG Kit
Supplies Used
- Pink Paislee Snow Village Paper Collection
- Variety of green and brown cardstock
- Perfect Pearls
- Ribbon
- Scotch Quick-dry glue
- Distress Ink
- Florist Foam
Dimensions
| Christmas Gift Bags and Boxes SVG Kit (LACEY BOX) | ||
| box_bottom.svg | 9.996"W x 7.265"H | Pattern Paper |
| box_sides1.svg | 9.996"W x 7.180"H | Pattern Paper |
| box_sides2.svg | 9.996"W x 7.180"H | Pattern Paper |
| lid.svg | 9.996"W x 9.731"H | Dotten Pattern Paper |
| 3D Wintergreens SVG Kit | ||
| boxwood.svg | 10.000"W x 1.155"H | Dark Green |
| Cut 12 | ||
| evergreen.svg | 11.300"W x 4.000”H | Light Green and Khaki |
| Cut 8 | ||
| evergreen_ferny.svg | 6.644"W x 8.000”H | Light Green and Dark Green |
| Cut 8 | ||
| evergreen_long.svg | 8.951"W x 3.441"H | Lime Green |
| Cut 8 | ||
| pinecone.svg | 9.000"W x 9.041"H | Brown |
| Cut 3 |
Instructions
- Open box_lid and size to dimensions in table above.
- Draw a 3.5" x 3.5" square in the center. Subtract the square from the box_lid to create a square hole in the lid (see image). You will need this hole to stick your wintergreens into the florist foam later. Cut and assemble lid as usual.
- Cut and assemble box_bottom and box_sides as usual. Put the florist foam inside and then adhere the completed lid on top. Tie a big bow around the box and set aside.
- Cut out all of the wintergreen and pinecone pieces as per dimensions in table above and assemble as per usual. Add paint, perfect pearls or even glitter to finished pieces. Once dry, start to arrange your bouquet around the bow to complete.
Design Tips

Chantel - SVGCuts Design Team
- Use a variety of green cardstock for the different wintergreen pieces to give the bouquet a more natural look.
- Don't forget to watch Mary's tutorials on how to make all the wintergreens and pinecones. They're super helpful!
- When arranging the bouquet, start with the bigger pieces (fern leaves etc.) and then add the smaller, thinner ones later to fill in any gaps. This will ensure that your bouquet looks nice and full.
Whilst this bouquet does take a bit of time to complete, the end result is definitely worth it! I had heaps of fun making it and hope that I've inspired you to make one of your own too!