

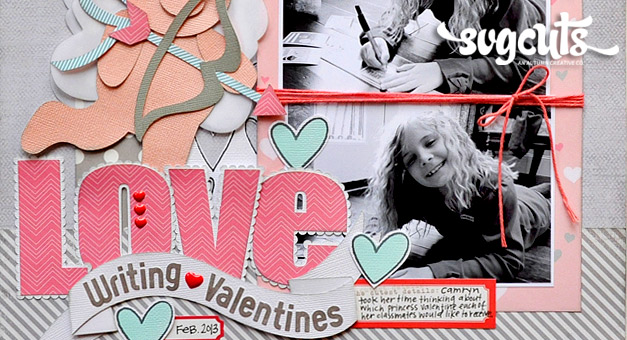


You can never have too many hearts on a page about Valentine’s Day! On this page about my daughter writing our her valentines, the cute cupid candy cherub bear is complimented by a lacy heart background layer and stamped heart accents.
SVG Collections Used
![]() A2 Lace Edged Cards SVG Collection
A2 Lace Edged Cards SVG Collection
![]() Candy Cherub Bears SVG Collection
Candy Cherub Bears SVG Collection
![]() Made in the USA SVG Kit
Made in the USA SVG Kit
![]() For My Valentine SVG Kit
For My Valentine SVG Kit
![]() Love Letters Freebie from 2.12.2010
Love Letters Freebie from 2.12.2010
Supplies Used
- Adhesive
- Foam Squares
- Solid and Patterned Papers
- Teal, Black, and Gray Ink Pads
- Heart Stamps
- Pink Shimmer Spray Ink
- Solid Pink Twine
- Enamel Heart Stickers
- Black Enamel Dots
- Label Stickers
- Gray Letter Stickers
- Journaling Pen
- Trimmer
- Scissors
Dimensions
| A2 Lace Edged Cards SVG Collection | ||
| mesh_half.svg | 7.350" W x 11.5" H | White |
| Candy Cherub Bears SVG Collection (Raspberry) | ||
| pink1.svg | 2.172" W x 6.5" H | Pink |
| pink2.svg | 3.717" W x 6.5" H | Pink |
| ribbon.svg | 1.516" W x 6.5" H | Blue Pattern |
| bow_arrow.svg | 3.107" W x 6.5" H | Blue Pattern |
| bow_arrow.svg | 3.107" W x 6.5" H | Gray |
| bow_arrow.svg | 3.107" W x 6.5" H | Dark Pink |
| white.svg | 3.930" W x 6.5" H | Vellum |
| Made in the USA SVG Kit (Banner - Presidential Pennant) | ||
| center.svg | 1.650" W x 2.128" H | White |
| center.svg | 1.650" W x 2.128" H | Dark Pink |
| For My Valentine SVG Kit (Hot Air Balloon Card) | ||
| banner.svg | 11.552" W x 2.004" H | White |
| Love Letters Freebie SVG from 2.12.2010 | ||
| white_parts.svg | 3.991" W x 5.189" H | White |
| red_parts.svg | 3.991" W x 2.574" H | Dark Pink |
| pink_parts.svg | 3.991" W x 2.186" H | Dark Pink |
Instructions
- Ink all edges of papers and die cut pieces with gray ink, if desired.
- Use 12” x 12” gray patterned paper as background. Cut a 2” x 11” strip of gray polka dot patterned paper and adhere vertically 1.5” in from the left edge and flush with the bottom edge of the background.
- Cut the heart mesh background from the A2 Lace Edged Cards SVG Collection. Use a black journaling pen to outline each of the hearts. Adhere to page background.
- Cut a 12” x 2.25” strip of gray striped patterned paper. Adhere to page 1” up from the bottom edge.
- Cut a 12” x 0.5” strip of dark pink pattern paper. Adhere to page below the gray striped paper strip.
- Mat two 3.5” x 5” horizontal photos with white cardstock. Adhere to a 6.25” x 8.25” block of pink patterned paper. Wrap solid pink twine around photo block several times and tie in a bow. Adhere photo block to lace background 0.75” from the right edge and 1.75” from the top edge of the background.
- Cut banner pieces from the Made in the USA SVG Kit. Layer together so that the white piece is slightly offset behind the dark pink pattern piece. Adhere layered banner piece to the top right corner of the photo block. Add two heart enamel stickers.
- Cut pieces for the Raspberry Candy Cherub Bear. Locate the three bow_arrow pieces. Use scissors to cut the arrow away from the gray bow_arrow piece so that only the bow is remaining. Adhere gray piece to blue piece. Use scissors to cut the arrowhead and feather pieces from the arrow. Adhere to blue piece. Set bow aside. Locate the two vellum wing pieces. Adhere them together slightly offset from each other. Continue assembling bear, adhering snout to face with foam squares. Add black pearl stickers for eyes. Add a heart enamel sticker for the nose. Add chalk to the bear’s cheeks and ears. Adhere bear to page.
- Cut and assemble the Love Letters title. Adhere to page below bear. Add three heart enamel stickers over the white dots on the letter “O.”
- Cut the banner from the For My Valentine SVG Kit. Use letter stickers to spell out title. Add heart enamel sticker in between the words in the title, if desired. Adhere to page below the Love Letters title.
- Use teal and black ink pads and heart stamps to create seven stamped hearts. Cut out with scissors. Adhere two hearts by the bear, two hearts near the top right corner of the photo block by the banner, and three hearts around the title.
- Add label stickers and journaling.
Design Tips

Jana Eubank - SVGCuts Design Team Member
- Outline die cuts for a casual, doodled feeling.
- Add your own layers to a die cut, like I did with the bow and arrow of the Candy Cherub Bear. Cut an image in several different colors of paper, then use your scissors to trim out portions of the shape. Adhere the shapes back together for a layered piece.
- Replace portions of your die cut with embellishments. For example, on this page I replaced the bear’s nose with a heart enamel sticker. The sticker was approximately the same size as the nose, and worked perfectly. I love the bit of shine the enamel brings to the page, as well. Another example on this page is the Love Letters Title. Instead of leaving the three dots on the letter “O,” I used them as a guide in placing three enamel heart stickers in the same spots.
Holiday rituals, like writing out valentines to your classmates. are so important in the memory of a child. Take time to capture them and add them to your family’s scrapbooks.