

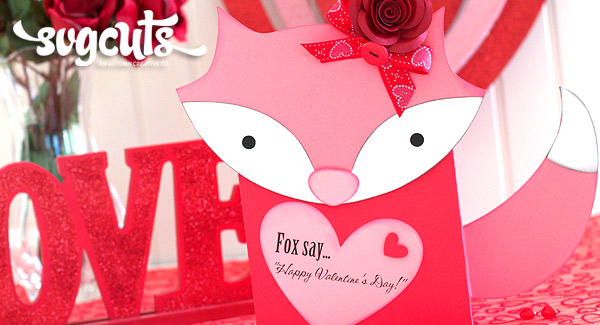


Looking for a really quick and cute Valentine mailbox to make? This project is perfect then! Give it to your foxy Valentine, or one of your little fox cubs at home!
SVG Collections Used
![]() Valentine Mailboxes SVG Kit
Valentine Mailboxes SVG Kit
![]() Hugs And Kisses SVG Kit
Hugs And Kisses SVG Kit
![]() Crush On You Boxes SVG Kit
Crush On You Boxes SVG Kit
Supplies Used
- Recollections Cardstock
- Pink, brown, and black ink pads
- Scoreboard
- Scotch Quick-Dry glue
- Heat glue gun
- Foam dots
- Scissors (for hand cutting the fox if you do not have SSDE)
Diagrams


Dimensions
| Valentine Mailboxes SVG Kit (Basic Drop Box) | ||
| bottom.svg | 11.400" W x 3.515" H | Hot Pink |
| box1.svg | 11.400" W x 7.360" H | Hot Pink |
| box2.svg | 11.400" W x 7.360" H | Hot Pink |
| lid.svg | 11.400" W x 11.400" H | Pink Pattern |
| Hugs And Kisses SVG Kit (Valentine House - Valentine Fox) | ||
| pink_dark.svg | 9.000" W x 8.785" H | Head + Tail Pink, Nose Light Pink |
| white.svg | 9.000" W x 9.575" H | White |
| (Extras - Hearts2) | ||
| heart1.svg | 1.460"W x 0.590" H | Hot Pink |
| heart2.svg | 6.040"W x 2.345" H | Light Pink |
| Crush On You Boxes SVG Kit | ||
| rose.svg | 4.220" W x 3.245" H | Red |
Instructions
- Basic Drop Box – Cut out and assemble. (Note: This is an older file which contains no score lines. Use a scoreboard to create your lines.)
- Rose – Cut out rose to size indicated above. Ink edges if desired with brown ink. Use hot glue to piece together.
- Fox – Load the Valentine Fox’s pink_dark.svg and white layer onto your work space. Size to measurements above. Using the knife tool, cut from one side of the fox’s head to the other side (See Diagram 1). Repeat the same thing to the tail (Diagram 2). Make two copies of the tail. Delete the body piece. Cut out. For those that do not have the knife tool, pull out your old fashioned scissors and make the cuts as indicated in the Diagrams.
- Fox Head – Assemble the head. I used scraps of black cardstock and glued it behind the fox’s mask creating her eyes. Ink with black around the mask to add some depth to the face. For the nose ink the edges with pink. Use foam dots to glue it and lift it off the face. Once the face is assembled glue it to front side of the box’s lid.
- Fox Tail – With the two pieces of the tail, create a score line parallel to the cut you made to create the tail. Glue the two tail pieces together up until the score line. Add the white tip to top of the tail. Ink edge in black.
- Attach the tail to side of the box using the folds you just created.
- Using the Print n Cut feature on the Silhouette, create your own foxy sentiment, or you could also just use a stamp you may have. Cut out your hearts and glue to front of box. Add foam dots to the little heart and place it approximately where the fox’s heart would be.
Design Tips

Ilda Dias - SVGCuts Design Team Member
- If you don't want to make a pink fox, make a more realistic colored one. You could also make it in all blues for the boys in your life!
- Not a “Fox” fan? Use any cuddly character from the SVG Cuts store and just follow the instructions above.
- This would make a really cute gift for a teacher. Change the sentiment to “Mr./Mrs. mailbox”. It’s large enough for storing all the little cards they get from the classroom kids.
This Valentine’s Day fill this cute mailbox with some goodies and give it to someone you love! I hope this has inspired you to create some of your own cute mailboxes. If you do please share on the SVG Cuts Facebook Page.
3 Responses to “Foxy Valentine's Day Mail Box by Ilda Dias”