


This simple and elegant Christmas Tree makes the perfect centerpiece for displaying your homemade treats this holiday season. Whether it’s truffles, candies, or mini macaroons your guests will love eating off of it!
SVG Collections Used
![]() Clara’s Christmas Strips SVG Collection
Clara’s Christmas Strips SVG Collection
![]() Catacomb Manor SVG Kit
Catacomb Manor SVG Kit
![]() December Gifts SVG Kit
December Gifts SVG Kit
![]() Stars and Stripes SVG Kit
Stars and Stripes SVG Kit
Supplies Used
- AC Card stock
- Recollections Card stock
- Silhouette chipboard or cereal box cardboard
- Ribbon
- Rhinestones
- Sequin border trim
- Embossing machine and wood pattern embossing folder
- Green ink for distressing the edge of each tier
- Scotch Quick-dry glue
- Heat glue gun
- Battery operated tea light
- Treats of choice
Dimensions
| Catacomb Manor SVG Kit (Witch Hat Topiary) | ||
| hat.svg | 12.150" H x 10.42" W | Brown |
| hat_panels1.svg | 10.695" H x 5.590" W | Brown |
| hat_panels2.svg | 10.695" H x 5.590" W | Brown |
| (circle from ungrouped hat.svg) | 6.460" H x 6.460" W | Green |
| Circle + Octagon from hat.svg (Tier 1 - bottom) | circle 6.460" H x 6.460" W + 3.380" H x 3.380" W | Chipboard/cereal cardboard (cut 4) + Green (cut 1 for top of tier) |
| Circle + Octagon from hat.svg (Tier 2) | circle 5.815" H x 5.815" W + 2.870" H x 2.870" W | Chipboard/cereal cardboard (cut 4) + Green (cut 2 for top and bottom of tier) |
| Circle + Octagon from hat.svg (Tier 3) | circle 5.165" H x 5.165" W + 2.245" H x 2.245" W | Chipboard/cereal cardboard (cut 4) + Green (cut 2 for top and bottom of tier) |
| Circle + Octagon from hat.svg (Tier 4) | circle 4.260" H x 4.260" W + 1.690" H x 1.690" W | Chipboard/cereal cardboard (cut 4) + Green (cut 2 for top and bottom of tier) |
| Circle + Octagon from hat.svg (Tier 5) | circle 3.390" H x 3.390" W + 1.185" H x 1.185" W | Chipboard/cereal cardboard (cut 4) + Green (cut 2 for top and bottom of tier) |
| Circle + Octagon from hat.svg (Tier 6) | circle 2.905" H x 2.905" W + 0.675" H x 0.675" W | Chipboard/cereal cardboard (cut 4) + Green (cut 2 for top and bottom of tier) |
| December Gifts SVG Kit (Tall Cylinder) | ||
| bottom.svg | 9.145" H x 11.400" W | Brown |
| top.svg | 5.150"H x 11.070" W | Brown |
| Basic Shape - Rectangle | 4.460" H x 11.050" W | Brown (Embossed) |
| Clara's Christmas Strips SVG Collection (Extras) | ||
| garland_bottom.svg | 0.785" H x 7.000" W | Green (cut 3) |
| garland_topm.svg | 0.585" H x 7.000" W | Red (cut 4) |
| holly_bottom.svg | 0.535" H x 6.100" W | Green (cut 3) |
| holly_top.svg | 0.3455" H x 6.100" W | Red (cut 3) |
| stiched_ribbon_bottom.svg | 0.250" H x 8.100" W | White (cut 2) |
| stiched_ribbon_top.svg | 0.250" H x 8.100" W | Red (cut 2) |
| beaded_strip.svg | 0.290" H x 13.500" W | Yellow |
| buttons_bottom.svg | 0.855" H x 5.315" W | Green (cut 2) |
| buttons_top.svg | 0.520" H x 5.315" W | Red (cut 2) |
| Stars and Stripes SVG Kit (Star-Shaped Box) | ||
| box_lid.svg | 4.660" H x 5.480" W (add 0.400" hole to center of stars) | Yellow (cut an extra star smaller size and emboss) |
Instructions
- Start by creating the tree top. Open up the file from Catacomb Manor SVG Kit (hat.svg). Break apart each piece. Regroup the hat with the score lines and then resize. Remove the hole from the octagon and circle. You will use the circle and the octagon to create the tiers of the tree.
- Cut out the tree top (hat.svg) and the panels (hat_panels1.svg and hat_panels2.svg). Glue panels to the center of the tree.
- Next, create each level (tier) on the tree. Start by creating 6 circles to the specified measurements indicated above, do the same for the octagons. To make things easier, you may choose to color each tier the same color. (Large octagon same color as large circle etc.). Once your shapes are all created then group the circles and octagons together. (The largest circle grouped with the largest octagon. Repeat this with the rest, in decreasing size). When grouping the circle and octagon together, ensure you center the octagon inside the circle, then group.
- Depending on the thickness of your papers you will require about 3-4 layers of cardboard/or chipboard for each tier. Use card stock to cover up and finish each tier. Ink the edges to match your card stock.
- Once you have finished assembling the tiers, arrange them from largest to smallest. Slide the largest layer (bottom tier) all the way to the base of the tree top (hat.svg). Bend the tabs of the tree top outward and glue to the underside of the tier. Glue the circle from the un-grouped hat.svg to cover up the tabs and finish the bottom tier of the tree.
- Continue sliding the remaining tiers from largest to smallest. Each tier should fit snugly into place. Glue each of them in place, ensuring they are level.
- To create the tree trunk (cylinder base), open up the tall cylinder file from the December Gifts SVG Kit. Cut the bottom.svg as directed. For the top.svg, break it apart, regroup the panel with the score lines, and then resize it. Remove the hole from the circles. Assemble the cylinder.
- Glue the top of the cylinder to the bottom tier of the tree top. Cut out a basic shape rectangle to size indicated above. Emboss if desired. Wrap and glue around the top piece of the cylinder.
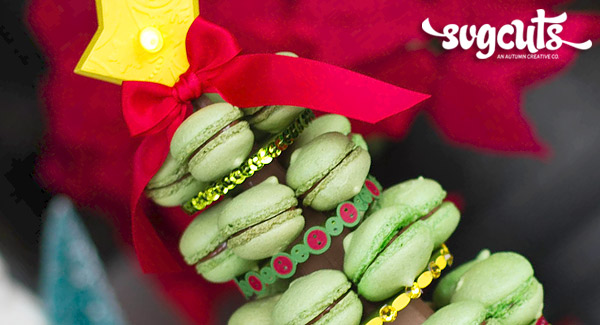
- Time to decorate the tree! Cut out each border to the lengths indicated above. You will notice the beaded_strip.svg is 13.5” W. You may have to angle this on your mat to fit it on one piece of paper. You can also use your slice tool to cut it at any point and use two pieces. Once all the borders are cut, glue them to the edge of each corresponding tier. I chose not to add a border to my top tier and used a sequin trim instead. If you did want to add another border, cut one of your choosing to measure 9.2” W. Embellish each border as desired. I also cut out extra bows to put on different levels of the tree, tying it all together.
- For the star tree topper, open up the box_lid.svg from the Star Shaped box (Stars and Stripes kit). Resize the file as indicated above. Next, break the pieces apart and then regroup the side panels of the star with the score lines. You should be left with two stars, one larger than the other. Create two circles 0.400” in diameter. Center the circle in the center of each star, group them. Make a copy of the smaller star. Cut out all the pieces and assemble. (The extra star will become the top layer of the star, emboss if desired.) Poke the flame of the electric tea light through the hole. Use glue if required to secure tea light to the star.
- Using hot glue, secure the star to the top of the tree. Hold in place until glue dries. Wrap a bow to the top of the tree.
- Stock your tree with your favorite treats. Don’t forget about the extra space you have in the tree trunk for more goodies! 😉
Design Tips

Ilda Dias - SVGCuts Guest Designer
- Choose card stock and papers to coordinate with the rest of your table décor.
- Use a heat embossing tool or a hair dryer to get rid of any glue strings that may have been left behind while gluing the tree together. (No one wants to eat glue strings!)
- I chose to use macaroons as my treats because they are not greasy. If you did want to use chocolates or anything else that may grease up your papers, place them in mini cupcake wrappers first.
- The space on each tier ranges from 1.1-1.5” W. Keep that in mind when making treats for this tree. My macaroons were mini sized, measuring around 1” in diameter.
- This would also make a sweet gift for someone. Fill up the tree with wrapped up chocolates, add a glue dot to the bottom of each to hold in place. Wrap it up with cellophane, and add a pretty Christmas bow and tag.
- This tree without the Christmas borders could also be used for a Birthday Party, an outdoor event or even a Japanese themed party as it looks like a Pagoda!
This project comes together fairly quickly. Hopefully in time for your Christmas party or event! I would love to see if any of you make this Christmas Tree of Treats. Don’t forget to share it on the SVG Cuts Facebook page! P.S. Don’t worry about eating a few of the treats, everybody knows dieting begins in the New Year!