

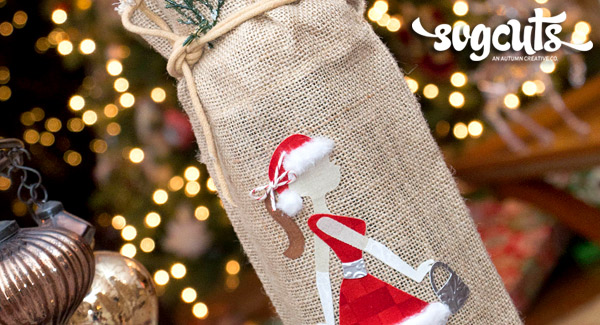


This project is a fun and fast way to give a gift of wine or sparkling grape juice. The Heat’n Bond was meant for a project like this for sure!
SVG Collections Used
![]() Kate’s Holiday Silhouettes SVG Collection
Kate’s Holiday Silhouettes SVG Collection
Supplies Used
- Thermoweb Heat’n Bond ULTRAHOLD Iron-On Adhesive
- Fabric Scraps
- Scotch Dry Adhesive
- Cotton Ball
- The Twinery Twine – Red Shimmer
- Single Bottle Jute Burlap Wine Bags with Drawstring from Amazon.com
- 6 Small Pearls
- Metallic Cardstock – Purse and Belt
- Greenery Optional – Under Drawstring
Dimensions
| Kate's Silhouettes SVG Collection (Silhouettes - Santa Baby) | ||
| figure.svg | 3.506"w X 8.681"h | Tan |
| red.svg | 2.554"w X 8.604"h | Red |
| white.svg | 2.719"w X 9.160"h | White |
| (Shopping) | ||
| bag.svg | 0.783"w X 4.473"h | Metallic |
Instructions
- Choose all of your scraps for the project and iron each piece. Cut your pieces out by hand to get them ready for the Heat’n Bond, these pieces should be cut 1 inch larger than the cut piece will be. Now cut the Heat’n Bond slightly smaller than the fabric piece and iron it to the back side of the fabric. When ironing the Heat’n Bond it is very important that your iron is set for NO steam. Set the iron on a medium setting and do not drag the iron over the Heat’n Bond. You put the iron down, hold for 10 seconds or so then pick up the iron and move around the piece until the Heat’n Bond is set and there are no loose edges.
- You are now ready to cut the finished pieces with your cutting machine. Make sure you have a new sharp blade in the machine. There are two methods, I have used them both. Place the fabric that has the Heat’n Bond adhered to the back face side up, in the upper left hand corner on your mat. Here is where one method might work better for you. You can leave the Heat’n Bond attached or can peel it off of the fabric and place it fabric side up on the mat. BOTH methods include loading the fabric with the right side up onto the mat. Depending on the thickness of your fabric you might want to set the machine to cut X2. NOTE: Cut away the boots from the white.svg, cut and paste to another page and cut in black. Also cut away the small belt piece from the white.svg and cut using metallic cardstock.
- You are now ready to iron your pieces onto the wine sack. Begin with the figure.svg, do not iron the long arm yet, it goes on after the dress is applied. Now iron on the red.svg pieces and the black boots. Apply the small pearls on top of the boots. Now iron on the long arm and the rest of the white.svg pieces and the metallic belt. Also iron on the pocketbook.
- Take your cotton ball and pull into pieces and stretch and mold it like the dress band and hat fur, use the Scotch Dry Adhesive to apply.
Design Tips

Kathy Helton - SVGCuts Designer
- Try this technique using different colors and maybe add a tree to the background.
- The Kate’s Holiday Silhouettes has so many options for the girl. Mix it up!
- When ironing small pieces,I just use the tip of the iron so that you do not over iron the other pieces.
This would be a great gift for anyone, take this to your party host and it will be a huge hit!!!!!!!