

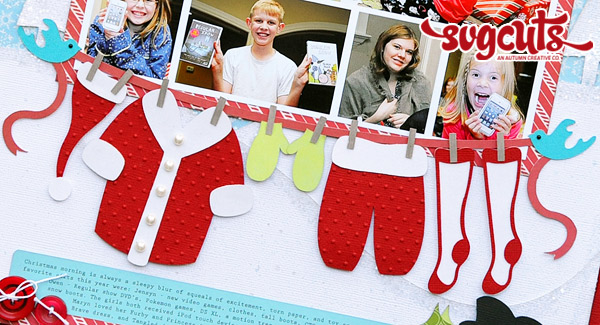


I imagine that on Christmas morning, while children all over the world are squealing in delight at the discovery of new treasures, that Santa’s wet work clothes would be hanging up to dry while he takes a much-deserved nap, just like this cute shape from the Santa’s North Pole Workshop collection.
SVG Collections Used
![]() Santa’s North Pole Workshop SVG Collection
Santa’s North Pole Workshop SVG Collection
![]() Snowy Scene Freebie from 11/1/2013
Snowy Scene Freebie from 11/1/2013
![]() Clara’s Christmas Eve SVG Kit
Clara’s Christmas Eve SVG Kit
![]() Cozy Candle Freebie from 12/1/2010
Cozy Candle Freebie from 12/1/2010
Supplies Used
- Adhesive
- Foam Squares
- Solid, Glitter, and Patterned Papers
- Ink Pad
- Glitter
- Pearl Stickers
- Buttons
- Twine
- Photo Corner Punch
- Computer Generated Journaling
- Embossing folder
- Embossing machine
- Paper Trimmer and Scissors
Dimensions
| Santa's North Pole Workshop SVG Collection (Santa's Clothesline) | ||
| mitten.svg | 0.77" W x 1.081" H | Lime Green |
| mitten.svg (mirror image) | 2.6" W x 0.686" H | Lime Green |
| clothespins.svg | 2.6" W x 0.686" H | Brown |
| clothesline.svg | 10.594" W x 2.549" H | Lt. Red |
| clothesline.svg | 10.594" W x 2.549" H | Blue |
| shoes_bottom.svg | 1.926" W x 2.162" H | Black |
| shoes_top.svg | 1.926" W x 0.494" H | Gold Glitter |
| jacket_bottom.svg | 2.889" W x 2.942" H | Red |
| jacket_top.svg | 2.889" W x 3.212" H | White Glitter |
| pants_bottom.svg | 1.926" W x 2.298" H | Red |
| pants_top.svg | 1.926" W x 0.680" H | White Glitter |
| sock_bottom.svg | 0.770" W x 2.658" H | White Glitter |
| sock_top.svg | 0.770" W x 2.658" H | Red |
| hat_bottom.svg | 0.963" W x 2.273" H | Red |
| hat_top.svg | 0.963" W x 1.077" H | White Glitter |
| Free Design - Snowy Scene (From 11/01/13) | ||
| snow_top.svg | 12.601" W x 9.54" H | White |
| snow_top.svg (mirror image) | 12.601" W x 9.54" H | White |
| Clara's Christmas Eve SVG Kit (Peppermint Card) | ||
| merry_bottom.svg | 4.738" W x 1.295" W | Blue |
| merry_top.svg | 4.738" W x 3.977" H | White Glitter |
| Free Design - Cozy Candle (From 12/01/10) | ||
| berries.svg | 4" W x 0.983" H | Red |
| holly.svg | 4" W x 2.152" H | Lime Green |
| holly.svg | 4" W x 2.152" H | Green Pattern |
| berries.svg | 3.161" W x 0.777" H | Red |
| holly.svg | 3.161" W x 1.701" H | Lime Green |
| holly.svg | 3.161" W x 1.701" H | Green Pattern |
Instructions
- Use 12” x 12” solid red paper as background. Cut a 11 5/8” x 11 5/8” blue patterned paper block. Cut two snow_top.svg from the Snowy Scene freebie, one of them should be flipped horizontally. Add adhesive to edge of the snow and trees and sprinkle with glitter. Adhere to blue patterned paper, with one layered over the other lower on the page. Turn paper over and use scissors or a trimmer to trim off the excess paper. Center and adhere blue patterned paper to page.
- Arrange and print photos with photo editing software. Adhere to a striped patterned paper block and adhere to page. Punch two black photo corners with a photo corner punch. Adhere photo corners to the top two corners of the blue patterned paper block.
- Cut Santa’s clothesline pieces. Use an embossing folder to add texture to the hat, coat, and pants, if desired. Trim birds from the blue clothesline.svg layer and adhere to the light red clothesline.svg layer. Add small black pearl stickers to the birds for eyes. Finish assembling the clothesline and adhere to page below the photo block. Embellish, as desired.
- Cut and assemble the Merry title. Adhere the red letters slightly offset from the white letters for a shadow effect. Embellish with pearls and adhere to the top right corner of the photo block with foam squares.
- Cut and assemble the holly. Adhere the lime green layer slightly offset from the green pattern layer for a shadow effect. Add a red button tied with twine to the center of the two larger berry clusters. Adhere one of the large holly clusters to the right of the title using foam squares. Adhere the other large holly cluster to the left side of the photo block.
- Create a journal block using a computer and print it out on blue cardstock. Trim to size and adhere to the bottom of the page. Add a 11 5/8” x 3/8” strip of red striped paper to the bottom of the page. On the right side of the journal block add the small holly cluster and Santa’s boots. Embellish the left side of the journal block with two red buttons tied with twine.
Design Tips

Jana Eubank - SVGCuts Guest Designer
- A few dimensional embellishments, like buttons or pearl stickers, added to your die cuts can really make them come to life!
- Cut two of a shape and adhere them together, slightly offset from one another, for a shadow effect. This will add more depth to your shape when you add it to your project.
- Add glitter to the edges of the snowy scene background for a wintry feel. Or save time and cut your shape from glittered paper.
- Use an embossing folder on portions of your shape to add a contrast in texture and pattern.
- Consider the mood or feeling you are trying to convey on your project and choose embellishments accordingly. For example, the pearl stickers and sparkling glitter add to the wintry feeling of this layout.
Now, if only us parents could sneak in a few winks on Christmas morning after all the paper clean-up and toy assembly. Ha! Wishing you a happy and cheerful Christmas morning!