

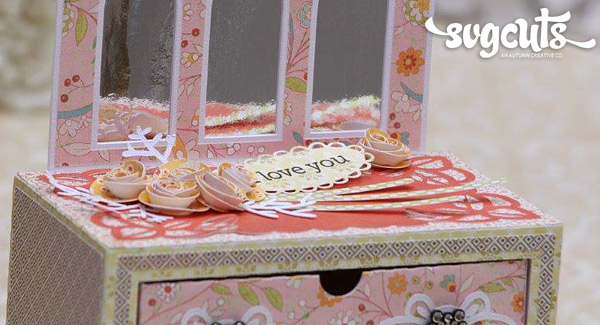


This fanciful dresser was so much fun to make and would be a great gift for a friend! Think about tucking a gift card or piece of jewelry in one of the drawers.
SVG Collections Used
![]() Call Me Later SVG Kit
Call Me Later SVG Kit
![]() April Avenue SVG Collection
April Avenue SVG Collection
![]() French Quarter Ironwork SVG Collection
French Quarter Ironwork SVG Collection
![]() Camp Firefly SVG Kit
Camp Firefly SVG Kit
![]() 3D Wintergreens SVG Kit
3D Wintergreens SVG Kit
![]() Thank You For The Music SVG Kit
Thank You For The Music SVG Kit
![]() Lunch With Mom SVG Kit
Lunch With Mom SVG Kit
Supplies Used
- 4 Decorative Buttons or Brads
- Scotch Quick Dry Adhesive
- Cardstock – White
- Cardstock – Serendipity (Digital) by BASICGREY
- Love You Stamp – Hero Arts CL582
- Mirror Board (Silver)
- Pop Dots
Dimensions
| Call Me Later SVG Kit (Dresser) | ||
| drawers1.svg | 10.500"W x 11.400"H | Pink Pattern |
| drawers2.svg | 10.500"W x 11.400"H | Pink Pattern |
| dresser_cloth.svg | 5.708"W x 3.018"H | Red |
| dresser1.svg | 10.000"W x 10.410"H | Green Pattern |
| dresser2.svg | 10.000"W x 10.755"H | Green Pattern |
| dresser3.svg | 11.400"W x 11.441"H | Pink Pattern |
| dresser4.svg | 6.000"W x 3.297"H | Pink Pattern |
| panel_top.svg | 5.800"W x 3.074"H | Red & Cream |
| panel_front_back.svg | 6.000"W x 9.036"H | Black & Cream |
| panels_sides.svg | 3.200"W x 9.066"H | Black & Cream |
| April Avenue SVG Collection (Daffodil Bunch) | ||
| bottom.svg | 2.137"W x 8.629"H | Light Green |
| French Quarter Ironwork SVG Collection | ||
| fleur.svg | 1.976"W x 0.963"H | White |
| Camp Firefly SVG Kit (Lantern Card) | ||
| lantern_bottom.svg | 2.800"W x 6.582"H | White |
| 3D Wintergreens SVG Kit (Evergreen Ferny) | ||
| evergreen_ferny.svg | 2.478"W x 5.504"H | White |
| Thank You For the Music SVG Kit (Many Thanks Card) | ||
| oval_bottom.svg | 2.279"W x 1.070"H | Green |
| Lunch With Mom SVG Kit (Tag) | ||
| flower_top.svg | 2.305"W x 2.192"H (Cut 3) | Orange |
| flower_top.svg | 2.761"W x 2.626"H (Cut 3) | Orange |
Instructions
- Cut and assemble dresser base.
- Attach the 4 Fleur and buttons or brads to drawers.
- Glue 5 1” X 8” strips together, repeat. Total of 2. These are braces and will be used later.
- Refer to dresser top photo, glue flower stem (I cut it larger and cut in half), then roses and place a pop dot under the stamped oval. Place the dot to the right so the stamped oval is slanted for better visibility.
- Open lantern bottom and center it on mat. Open the basic shape circle and center it on mat. Move the circle over the top of the lantern and place under the handle and just over the piece that looks like a house with a roof. Center it also. Edit, select all and choose path, then union. Resize to 5.463W by 5.038L. Choose object, shadow layer, and choose size 1.50. Slide top piece off and move to another page. You will cut 1 of these which will be your decorative layer (top piece). Cut 4 of the bottom layer, I used white and carefully glue on top of each other. Glue the decorative paper on top, make sure the surrounding edges are even. And last step! Break apart the bottom layer until all you have is the background. This piece will be used to cut the mirror board.
- You are now ready to attach the backboard to the base. Use the glued 1” X 8” strips. Glue them to the back of the backboard first, gluing about 1” from the outside edges. (Use 4” for the top and 4” for the bottom). Attach this assembled piece to the base. It will be very sturdy!
Design Tips

Kathy Helton - SVGCuts Guest Designer
- Be very careful when you glue the mirror board to the backboard, trust me, if you get too much glue it shows!
- Think about using pierced earrings for the drawer embellishments. I think that would be really cool especially if they had a little dropped pearl or special adornment. Then surprise that special person with a necklace in the box that matches.
- Be creative with your papers. I used some very soft coloring, try something bold or seasonal!
I hope you will enjoy making this special dresser for yourself or a special someone. The mirrored piece is so beautiful, I hope you make it and post it so we can share your achievement.
3 Responses to “Fancy Dresser by Kathy Helton”