

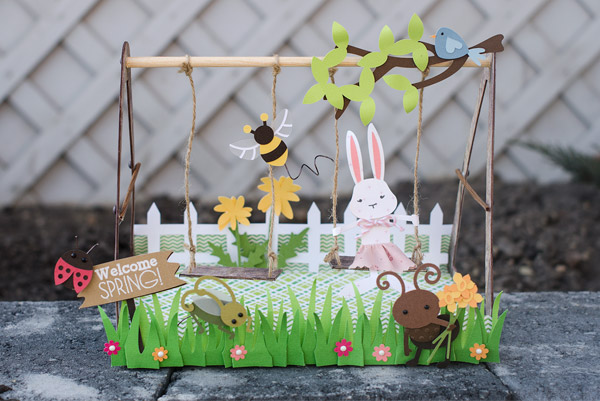


Here’s a fun project for you! Did you ever think that you can create a swing set using a Ferris wheel base? By altering some measurements, yes, it’s possible! I love to "think outside the box" and inspire you to use SVG Cuts' files in different ways! (Don’t be intimidated by the lengthy instructions – I made sure that it was explained in detail so you can follow it step-by-step!)
SVG Collections Used
![]() Summer Street Carnival SVG Kit
Summer Street Carnival SVG Kit
![]() Easter Morning Egg Hunt SVG Collection
Easter Morning Egg Hunt SVG Collection
![]() April Avenue SVG Collection
April Avenue SVG Collection
![]() Strawberry Lane SVG Collection
Strawberry Lane SVG Collection
![]() My Happy Garden Hideaway SVG Collection
My Happy Garden Hideaway SVG Collection
![]() Cheryl’s Cute Bugs SVG Collection
Cheryl’s Cute Bugs SVG Collection
Supplies Used
- AC Cardstock
- Echo Park Paper – Country Drive collection, wooden paper from Homemade collection
- Wooden rods – Thick (about 0.25’ diameter) – 10” inches
- Thin (about 0.125’ diameter) – 4.5” inches (requires 2)
- Wire
- Jute twine (requires 4 of 11.0” long)
- Pink twine for rabbit’s bow
- Pink Fabric for rabbit’s skirt
- Vellum
- Washi tape (used to cover the plain rods – may also be painted, or left plain)
- Any rhinestone/pearls/dots for eyes and to cover up the sides for the thick rod
- Embossing folder – polkadot
- Eyelet punch or any tiny circle punch for making holes on the swing seat (You can always just add 4 tiny circles to each corners of rectangle before cutting)
- Unity/SVG Cuts co-brand stamp – bunnies and blossoms set
- Pigment ink
- White embossing powder
- Foam tape
- Heat glue gun
- Scotch Quick-dry Glue
Dimensions
Anything marked with (*) - please refer to instructions before cutting. Size to specified width and height. If only width is provided, size using "keep proportions" or aspect lock.
| Summer Street Carnival SVG Kit | ||
| Ferris Wheel | ||
| bottom_liner.svg | 9.87" wide by 6.811" high | cardboard or thick cardstock |
| support1.svg (*) | 8.5" wide | brown cardstock |
| support 3.svg (*) | 8.5" wide (cut 12) | 8 cardstock, 4 wood patterned paper |
| bottom.svg (*) | 6.931" wide by 20.5" high | green patterned paper |
| Easter Morning Egg Hunt SVG Collection | ||
| strips.svg | 11.0" wide (cut 3) | light & 2 med green |
| April Avenue SVG Collection | ||
| Painting Bunny | 0.733" wide | pink |
| pink.svg | 4.5" wide | cream patterned paper |
| body.svg | ||
| Daffodil Bunch | 1.38" wide | yellow & light orange |
| mid.svg | 0.626" wide | matcha green |
| bottom.svg | ||
| Bird | 0.104" wide | light orange |
| beak.svg | 0.6" wide | light blue |
| accents.svg | 1.00" wide | med blue |
| body.svg | ||
| Strawberry Lane SVG Collection | 6.0" wide | light green |
| branch_top.svg | 6.0" wide | med brown |
| branch_bottom.svg | 2.0" and 2.5" wide | yellow |
| dandelion_top.svg | 2.0" and 2.5" wide | matcha green |
| dandelion_bottom.svg | ||
| My Happy Garden Hideaway SVG Collection | ||
| picketfence_long.svg | 15.0" wide (*) | white |
| sign_face.svg | 3.0" wide | tan |
| sign_base.svg | 3.0" wide | dark brown |
| trellis_top. Svg | 3.0" wide (black out, flowers only) | fushia, pink, light orange |
| Cheryl's Cute Bugs SVG Collection | ||
| Ant | ||
| ant_top.svg | 2.0" wide | light, med and dark brown |
| Bee | ||
| bee_top1.svg | 2.0" wide | dark brown |
| bee_top2.svg | 2.0" wide | yellow |
| bee_mid1.svg | 2.0" wide | white |
| bee_mid2.svg | 2.0" wide | vellum |
| Grasshopper | ||
| grass_top.svg | 2.0" wide | olive green |
| grass_mid1.svg | 2.0" wide | vellum |
| grass_mid2.svg | 2.0" wide | matcha green |
| Ladybug | ||
| lady_top.svg | 1.0" wide | red |
| lady_middle.svg | 1.0" wide | dark brown |
| SCAL Basic Shapes | ||
| horizontal rectangle | 2.75" wide by 1.0" wide (cut 12) | 10 in cardstock, 2 wood patterned paper |
Instructions
- Open support1.svg and resize to 8.5” wide. Break apart, and then, break apart again. (The first time you ‘break apart’ – it separates out the cut elements, but the score lines are still ‘grouped’ together. The second ‘break apart’ click will separate out the score lines.) Delete both rectangle pieces.
- Select the ‘piece’ on the right sitting at an angle (side support piece) and regroup, including the score lines. Rotate that piece so that it is perfectly vertical. It will help you to enlarge the mat as big as you can and make sure that it is parallel to the mat vertical grid line. There’s no easy way to do it – just need to eye-ball it. The piece should measure 1.884” wide by 4.97” high when the piece is vertical. Put it to the side of the mat – do not cut just yet. (Diagram 1)
- All you should have left on the mat now is the ‘support’ triangular piece. Select the tiny circle on the top of the support piece and resize to your thick dowel diameter. Now, select the middle triangular cut out and resize to 6.0” wide and 6.5” high. You will now move that circle and the inner piece over to the side ONLY – using the horizontal arrow. Do NOT change the y-axis (move them up or down). THIS IS IMPORTANT. You will now select the left over piece (outside triangle and the score lines) and ‘group.’ Hit ‘group’ AGAIN to include the score lines and to keep them where they are. Use H-align to bring the piece to the middle of the mat. Take the small circle and the inner triangle piece that you put them to the side, and H-align them as well. (Diagram 2) Cut 2.
- Open bottom.svg and resize to 6.931” wide. Uncheck ‘keep proportions’ and ONLY change the height to 20.5” high. This will be very big. You will need to now ‘break apart’ and cut each rectangle separately on a mat. Each rectangle should measure 6.811” wide by 9.870” high after breaking them apart. Just to make sure that these pieces WILL fit – you can line up the side support piece that you had put aside and line them up to one of these rectangles. (Diagram 3) If the pieces look like this, go ahead and cut them both. You will need to cut 2 of the side support piece.
- Open support3.svg and resize to 8.5” wide, and then break apart. Select the tiny circle and resize to your thick dowel diameter. Select the inner triangle piece and resize to 6.0” wide by 6.5” high. Using the H-align feature, align the circle, inner triangle and the outer triangle. (Diagram 4) Cut 12 (you may change the amount depending on how sturdy you want the swing set to be.) I cut 8 of them in regular cardstock, 4 in wooden patterned paper. Each side (going from outside) should have a wooden paper piece, 4 cardstock piece, 1 side support piece with the score lines (step 3), and another wooden patterned piece to cover the inner flaps. Using the assembly video for the ‘base portion’ of the ferris wheel, put together the swing set base. Make sure that the inner wooden paper piece is the last one to glue to cover the inner flaps.
- Making the swing seat. Open horizontal rectangle and resize. Cut 10 in regular cardstock and 2 in wooden patterned paper. Each swing should have 6 rectangles glued together, with the patterned paper on top. Using eyelet punch or any ‘strong’ punch, make 4 tiny circles to each corner of the rectangle. If you don’t have a punch, you may want to add the circles to the rectangle on the mat before cutting. Take jute twine and thread through one corner from the top, and bringing it back up from the other hole. Tie the end to the longer strand. Repeat to the other side of the seat, and then do the same to the other seat.
- Cut the dowels into measurements given. You may wrap washi tape around it to add more interest, paint the dowels, or leave them plain. Using hot glue gun, adhere each of the thick dowel ends to the swing set base. The small dowel pieces can be adhered to the side support piece, just to give it a ‘swing set look.’
- Tie the swing seats to the top wooden dowel, making sure that they sit horizontally and is roughly at the same height. The swing set is done!
- Cut all the other pieces, adding in various embellishments to give interest. The picket fence strip will be LARGER than the mat. That is okay – it will still cut. Just make sure that the fence is at least 10” in length. You will need to clip off the ends to fit the swing set. Since the side support piece will be at an angle, make sure that the fence will still set upright. Adhere the grass strip to the front, keeping in mind the angle. I glued one strip down at an angle (light green strip), and adhered the second medium grass strip upright. Since the front grass strip is pleated – you will require two strips to cover the entire width.


Design Tips

Thienly - SVGCuts Design Team Artist
- Think about how you would like the ‘style’ to be. Go for a wooden swing set if you want a warm or vintage look. You can change it to a metallic paper or a simple black/grey if you would like your project to be simple and modern. Think about the colors you want to use. Vibrant colors? Pastels? It will be easier if you ‘pick’ a paper collection to work with, and use the color palette from there.
- Add some interest by using various embellishments: wires, twine, rhinestones, pleated grass, embossing and foam tape. Foam tape gives dimension and makes the project more interesting.
- Don’t be limited to ‘spring’. Autumn scene would be so pretty with random leaves falling from the top branch. You can even add scarecrows, apples and pumpkins.
- Valentine swing set would be cute to have bears from Candy Cherub Bears SVG Collection sitting on the swing, one holding a heart balloon, and the other bear with a wing. You can also make it especially for ‘Easter’ hiding some small jelly beans/eggs in them – that would make a great gift!
How fun would it be to create your own playground and decorate it the way you want to? Don’t be limited by the files I used – get creative! If you create one, or create something inspired from this – please post your project over on SVG Cuts FB page! We’d LOVE to see your take on it!