


I created this fun and simple St. Patrick's Day banner with just one SVGCuts collection! As the old Irish blessing goes, "may your blessings outnumber the shamrocks that grow, and may trouble avoid you wherever you go." This banner design would also be great for many other holidays using different shapes, etc.
SVG Collections Used
![]() Celtic Knots and Clovers SVG Collection
Celtic Knots and Clovers SVG Collection
Supplies Used
- Card Stock
- Paper Glue
- Hot Glue Gun & Glue
- 4. 2” Wide Ribbon
Dimensions
| Celtic Knots and Clovers SVG Collection | Size | Paper Color |
| heart_top.svg (cut 2) | 5.500"W X 5.101"H | green leaf pattern |
| heart_bottom.svg (cut 2) | 5.250"W X 5.049"H | tan textured pattern |
| shamrock_knot_top.svg (cut 2) | 5.241"W X 5.087 | green leaf pattern |
| shamrock_knot_bottom.svy (cut 2) | 5.240"W X 5.247"H | tan textured pattern |
| heart_bottom.svg (cut 2) (this is the largest bottom layer) | 6.750"W X 6.491"H | green plaid pattern |
| Shamrock_knot_bottom.svy (cut 2) (this is the largest bottom layer) | 6.510"W X 6.519"H | green plaid pattern |
| 3_bottom.svg (cut 2) *clover | 5.500"W X 5.499"H | green leaf pattern |
| 3_top.svg (cut 2) *clover | 4.686"W X 2.329"H | tan textured pattern |
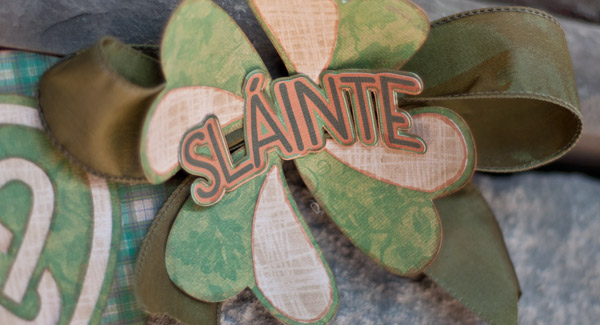
| slainte.svg (cut 2) * extras printables | 3.960"W X 1.538"H | printed on plain paper |
| slainte.svg (cut 2) blackout shadow | 4.039"W X 1.607"H | green printed on plain paper |
Instructions
- Cut all SVGCuts.com files
- Print printables "Slàinte" file (or cut files out)
- Create and print a printables blackout of the "Slàinte" file (of course you could always cut these files if you can’t print and cut)
- Ink sides of cut pieces (optional)
- Assemble all pieces using paper glue
- Tie two ribbon bows (these will go behind the end shamrock shapes, as seen in photo)
- Hot glue finished shamrocks with the word Slàinte on to each bow
- Lay finished heart and shamrock knot pieces out on your ribbon (center and space them)
- Hot Glue finished pieces on to the ribbon
- Hot Glue your finished shamrock bows onto the banner ribbon (one on each end)
- To hang your banner, simply tack it with thumbtacks to your wall or mantel etc., using the ribbon behind the end shamrocks.
Design Tips

Fleurette - SVGCuts Design Team Artist
- I like to ink my sides with Copic markers, especially the smaller more detailed cuts. I then go over them with the colorless blender, to give it a soft inked look.
- I gave this project a stained vintage feel by edging with a light brown tea color.
- I used digital papers that I found on a blog that were free! "Freebies Vintage Paper – Patrick's Day" from http://farfarhill.blogspot.com. I loved the look and feel of them. I did brighten them up a bit in Photoshop. The only color paper that is not part of this freebie was the accent tan paper.
- I found it best to lay everything out on the ribbon before gluing it down to make sure and get everything spaced evenly.
Happy St. Patrick's Day! Remember this banner can be made for any holiday, simply replace the shamrocks with cuts from other holiday SVGCuts.com files. The possibilities are endless! Free your mind, have fun and create! 🙂