

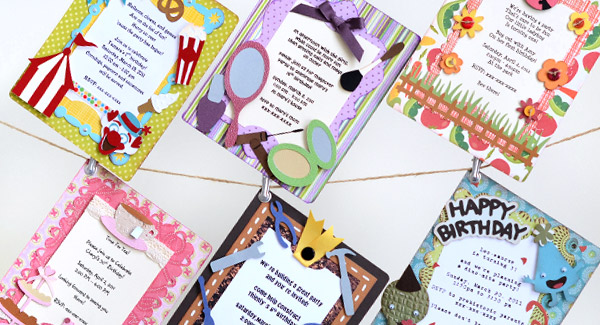
How fun would it be to receive party invitations like these? As soon as you see these cards, you wouldn't dream of missing these parties! Or imagine how thrilled your kids are going to be for a mommy to make cool invites like these? Handmaking cards set an excitement for the party that none of the store bought cards can offer.
All the cards below uses the same base - the basic set from Elegant Framed Invitation SVG Kit.
*For each of the following cards, the first step is the same. The basic_top.svg was broken apart, frame deleted (the slits only remain) and replaced and grouped together with a different frame. The basic_bottom.svg is all cut at the same size.
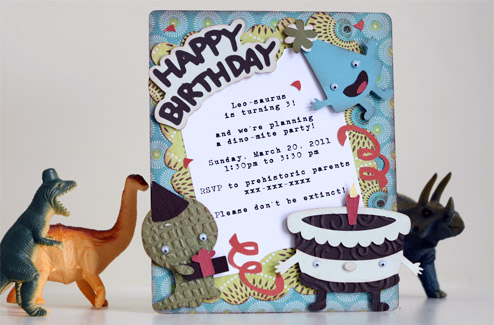
Dinosaur Party Invite
SVG Collections Used
1. ![]() Elegant Framed Invitations SVG Kit
Elegant Framed Invitations SVG Kit
2. ![]() Strawberry Lane SVG Collection
Strawberry Lane SVG Collection
3. ![]() Birthday Dino SVG Collection
Birthday Dino SVG Collection
Dimensions:
Here are the exact shapes, sizes and colors I used. Size to the dimensions shown below with “Keep Proportions” checked in the Shape Properties window, unless otherwise noted on the dimensions table.
| Elegant Framed Invitations SVG Kit | ||
| basic_top.svg | 5.75" wide (delete frame) | glitter green |
| basic_bottom.svg | 5.75" wide | glitter blue |
| Strawberry Lane SVG Collection | ||
| frame_scalloped_top (blackout) | 5.74" wide and 6.70" high | glitter green |
| Birthday Dinos SVG Collection | ||
| party_hat_tongue.svg | 2.35" wide | red |
| party_hat_mouth.svg | 2.35" wide | brown |
| party_hat_top.svg | 2.35" wide | moss green and white |
| party_hat_bottom.svg | 2.35" wide | blue |
| cake_flame.svg | 3.54" wide | pastel yellow |
| cake_candle.svg | 3.54" wide | red |
| cake_top.svg | 3.54" wide | cream green |
| cake_bottom.svg | 3.54" wide | brown |
| happy_birthday_top.svg | 3.50" wide | brown |
| happy_birthday_bottom.svg | 3.50" wide | cream green |
| confetti.svg | 1.5" wide (cut 2) | red |
| T Rex with Gift1 | ||
| ribbon.svg | 2.00" wide | red |
| hat_gift.svg | 2.00" wide | brown |
| body.svg | 2.00" wide | moss green |
Instructions
1. After the first step (*), group together with the black out frame from Strawberry Lane SVG Collection (making sure that the slits line up in the middle). Cut.
2. Make an invite, and cut all parts from Birthday Dino SVG Collection and adhere them to the card. Embellish as needed.
Design Tips:
- I inked the edges to give "prehistoric" look.
- Used googly eyes for the characters.
- The top layer to the invitation was purposely adhered crooked to make the invite more fun!
- Embossing can add character to dinosaurs and the cake.
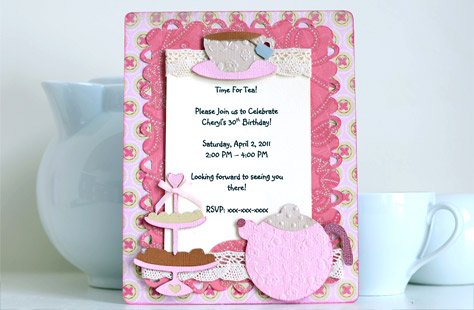
Tea Party Invite
SVG Collections Used
1. ![]() Elegant Framed Invitations SVG Kit
Elegant Framed Invitations SVG Kit
2. ![]() Robin's Return SVG Collection
Robin's Return SVG Collection
3. ![]() An Afternoon at Auntie Elaine's SVG Collection
An Afternoon at Auntie Elaine's SVG Collection
Dimensions
Here are the exact shapes, sizes and colors I used. Size to the dimensions shown below with “Keep Proportions” checked in the Shape Properties window, unless otherwise noted on the dimensions table.
| Elegant Framed Invitations SVG Kit | ||
| basic_top.svg | 5.75" wide (delete frame) | glitter fushia |
| basic_bottom.svg | 5.75" wide | glitter pink |
| Robin's Return SVG Collection | ||
| scalloped_shapes_rectangle.svg | 5.75" wide and 6.62" high | glitter fushia |
| An Afternoon at Auntie Elaine's SVG Collection | ||
| stand2_top.svg | 2.20" wide | pearl pink |
| stand2_middle.svg | 2.20" wide | beige |
| stand2_bottom.svg | 2.20" wide | brown |
| teacup_top.svg | 2.15" wide | brown and pearl pink |
| teacup_bottom.svg | 2.15" wide | pearl beige |
| teapot_top.svg | 2.93" wide | pearl fushia |
| teapot_bottom.svg | 2.93" wide | pearl pink and pearl beige |
Instructions
1. After the first step (*), group together with the frame from Robin's Return SVG Collection (making sure that the slits line up in the middle). Cut.
2. Make an invite, and cut all parts from An Afternoon at Auntie Elaine's SVG Collection and adhere them to the card. Embellish as needed.
Design Tips
- Added lace to give it "special occasion" look.
- A small tag rectangle was cut with hand and adhere to the twine to make a tea bag.
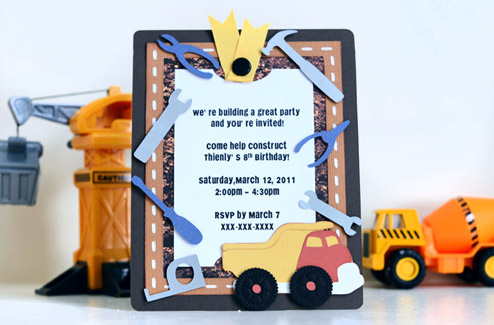
Construction Party Invite
SVG Collections Used
1. ![]() Elegant Framed Invitations SVG kit
Elegant Framed Invitations SVG kit
2. ![]() Winter Bliss SVG Collection
Winter Bliss SVG Collection
3. ![]() Play All Afternoon SVG Collection
Play All Afternoon SVG Collection
4. ![]() Cliff's Clubhouse Cards SVG Kit
Cliff's Clubhouse Cards SVG Kit
Dimensions
Here are the exact shapes, sizes and colors I used. Size to the dimensions shown below with “Keep Proportions” checked in the Shape Properties window, unless otherwise noted on the dimensions table.
| Elegant Framed Invitations SVG Kit | ||
| basic_top.svg | 5.75" wide (delete frame) | dirt patterned |
| basic_bottom.svg | 5.75" wide | brown |
| Winter Bliss SVG Collection | ||
| stitched_top.svg | 5.20" wide by 6.50" high (blackout) | dirt patterned |
| stitched_top.svg | 5.20" wide by 6.50" high (delete dotted lines) | white |
| stitched_top.svg | 5.20" wide by 6.50" high | light brown |
| Play All Afternoon SVG Collection | ||
| truck_top.svg | 3.44" wide | red |
| truck_bumper.svg | 3.44" wide | white |
| truck_tires.svg | 3.44" wide | black |
| truck_bottom.svg | 3.44" wide | yellow |
| Cliff's Clubhouse Cards SVG Kit (Workshop Card) | ||
| tools1.svg | 4.50" wide (delete level and drill) | blue |
| tools2.svg | 4.50" wide (delete saw) | silver |
Instructions
1. After the first step (*), group together with the black out frame from Winter Bliss SVG Collection (making sure that the slits line up in the middle). Cut.
2. Cut 2 more frames - one with the dotted lines only deleted and another frame (original). Adhere to the file cut in step one.
3. Make an invite, and cut all parts from Play All Afternoon SVG Collection and Cliff's Clubhouse Cards SVG Kit and adhere to the card. Embellish as needed.
Design Tips
- The wheel of the truck was embossed with Clockworks Cuttlebug folder.
- A ribbon at the top was attached with brads.
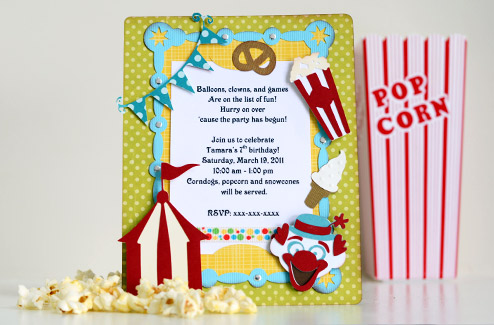
Carnival Party Invite
SVG Collections Used
1. ![]() Elegant Framed Invitations SVG Kit
Elegant Framed Invitations SVG Kit
2. ![]() Winter Bliss SVG Collection
Winter Bliss SVG Collection
3. ![]() A Day at the Carnival SVG Collection
A Day at the Carnival SVG Collection
4. ![]() Birthday Elements SVG Collection
Birthday Elements SVG Collection
Dimensions
Here are the exact shapes, sizes and colors I used. Size to the dimensions shown below with “Keep Proportions” checked in the Shape Properties window, unless otherwise noted on the dimensions table.
| Elegant Framed Invitations SVG Kit | ||
| basic_top.svg | 5.75" wide (delete frame) | yellow patterned |
| basic_bottom.svg | 5.75" wide | dotted green |
| Winter Bliss SVG Collection | ||
| beaded.svg | 4.80" wide | light blue |
| beaded.svg | 4.80" wide (blackout) | yellow patterned |
| A Day at the Carnival SVG Collection | ||
| tent_top.svg | 2.25" wide | red |
| tent_bottom.svg | 2.25" wide | cream |
| popcorn_top.svg | 1.12" wide | red |
| popcorn_mid.svg | 1.12" wide | cream |
| popcorn_bot.svg | 1.12" wide | white |
| clown_face_top.svg | 2.0" wide | red |
| clown_face_middle.svg | 2.0" wide | blue |
| clown_face_bottom.svg | 2.0" wide | white |
| clown_face_bottom.svg | 2.0" wide (blackout) | brown |
| pretzel_bottom.svg | 1.12" wide | brown |
| ice_cream_top.svg | 0.87" wide | white |
| ice_cream_bot.svg | 0.87" wide | brown |
| Birthday Elements SVG Collection | ||
| pennantsbot.svg | 3.45" wide | dotted blue |
Instructions
1. After the first step (*), group together with the black out frame from Winter Bliss SVG Collection (making sure the the slits line up in the middle). Cut.
2. Cut another frame (original) from Winter Bliss Collection and adhere to the top of the file cut in step 1.
3. Make an invite, and cut all parts from A Day at the Carnival SVG Collection and Birthday Elements SVG Collection and adhere them to the card. Embellish as needed.
Design Tips
- Different heights of pop-dots makes elements stand out, but one more than the other (unique effect!)
- Silver metallic dots were added (I used Imaginisce i-rock)
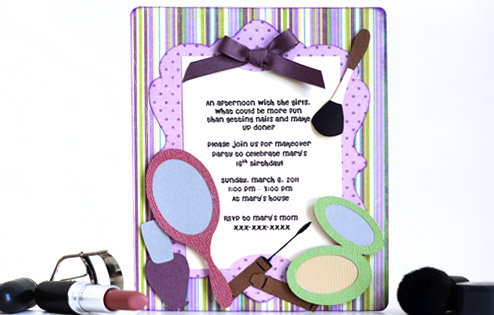
Make Up Party Invite
SVG Collections Used
1. ![]() Elegant Framed Invitations SVG Kit
Elegant Framed Invitations SVG Kit
2. ![]() Strawberry Lane SVG Collection
Strawberry Lane SVG Collection
3. ![]() Paula's Boutique SVG Collection
Paula's Boutique SVG Collection
Dimensions
Here are the exact shapes, sizes and colors I used. Size to the dimensions shown below with “Keep Proportions” checked in the Shape Properties window, unless otherwise noted on the dimensions table.
| Elegant Framed Invitations SVG Kit | ||
| basic_top.svg | 5.75" wide (delete frame) | glitter dotted purple |
| basic_bottom.svg | 5.75" wide | glitter stripes |
| Strawberry Lane SVG Collection | ||
| label2_bottom.svg | 6.8" wide and 5" high | glitter dotted purple |
| Paula's Boutique SVG Collection | ||
| mirror_top.svg | 1.5" wide | pearl fushia pink |
| mirror_bottom.svg | 1.5" wide | silver |
| brush1_top.svg | 0.6" wide | black and metallic brown |
| brush1_bottom.svg | 0.6" wide | cream |
| compact_top.svg | 2.38" wide | pearl green |
| compact_middle.svg | 2.38" wide | silver |
| compact_bottom.svg | 2.38" wide | tan |
| mascara_top.svg | 0.88" wide | metallic brown |
| mascara_bottom.svg | 0.88" wide | black |
| nail_polish_top.svg | 1.04" wide | silver |
| nail_polish_bottom.svg | 1.11" wide | purple |
Instructions:
1. After the first step (*), group together with the frame from Strawberry Lane SVG Collection (making sure that the slits line up in the middle). Cut.
2. Make an invite, and cut all parts from Paula's Boutique and adhere them to the card. Embellish as needed.
Design Tips
- I used glitter/pearl/metallic paper to add to the glam feel.
- Use pop-dots to bring out different elements of the card. Glue gun was used to adhere the ribbon.
Bug Party Invite

SVG Collections Used
1. ![]() Elegant Framed Invitations SVG Kit
Elegant Framed Invitations SVG Kit
2. ![]() Moonlight Garden Party SVG Collection
Moonlight Garden Party SVG Collection
3. ![]() My Happy Garden Hideaway SVG Collection
My Happy Garden Hideaway SVG Collection
4. ![]() Easter Morning Egg Hunt SVG Collection
Easter Morning Egg Hunt SVG Collection
5. ![]() Dawn's Doilies SVG Collection
Dawn's Doilies SVG Collection
Dimensions
Here are the exact shapes, sizes and colors I used. Size to the dimensions shown below with “Keep Proportions” checked in the Shape Properties window, unless otherwise noted on the dimensions table.
| Elegant Framed Invitations SVG Kit | ||
| basic_top.svg | 5.75" wide (delete frame) | checkered red |
| basic_bottom.svg | 5.75" wide | veggie patterned |
| Moonlight Garden Party SVG Collection | ||
| frame_top.svg | 6.80" wide and 4.46" high | checkered red |
| My Happy Garden Hideaway SVG Collection | ||
| picket_fence_long.svg | 5.75" wide | brown |
| ladyb_top.svg | 1.27" wide | red |
| ladyb_bot.svg | 1.27" wide | black |
| Easter Morning Egg Hunt SVG Collection | ||
| grass2.svg | 5.75" wide | moss green |
| Dawn's Doilies SVG Collection | ||
| 6petalbot.svg | 0.80" wide and 1.0" wide | red and orange |
| primrosebot.svg | 0.85" wide and 1.10" wide | orange and yellow |
| daisybot.svg | 1.0 " wide and 1.25" wide | yellow and red |
Instructions
1. After the first step (*), group together witht the black out frame from Moonlight Garden Party SVG Collection (making sure the the slits line up in the middle). Cut.
2. Make an invite, cut all parts from the rest of the 3 collections, and adhere them to the card. Embellish as needed.
Design Tips

Thienly - SVGCuts Design Team Artist
- Jewelry wires were used for the antennae of the ladybug. (adhered with glue gun)
- Buttons were tied with twine before adhering to the flower.
- Choose fonts to match with the party theme (so many free fonts online!) and choose fun sentiments!
See, aren't they fun? I hope that I have inspired you to make your own invitations for your next party!
(Invitation wording is from invitationbox.com and amazingmoms.com)
- Thienly
14 Responses to “Thienly's Corner - Themed Birthday Party Invitations”