

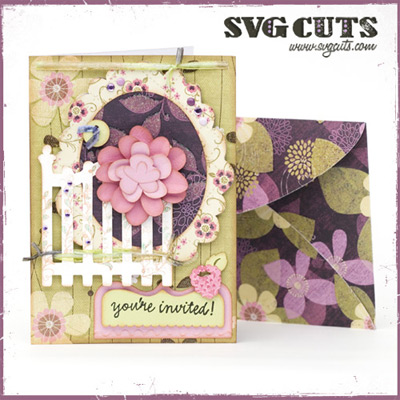


I'm so happy with this gorgeous summer party invitation, and can’t wait to mail them! Better yet, you could totally change the caption to “Happy Birthday” or “Thank You,” etc. I always have an upcoming birthday or a thank-you note to send.
I loved working with this gorgeous BoBunny Jazmyne Glitter paper and coordinating Bazzil cardstock. When I found it while shopping, I HAD to have it. And this time, all the Bazzil cardstock I used (just picked it up at Archiver’s) cut perfectly!
SVG Collections Used
![]() Moonlight Garden Party SVG Collection
Moonlight Garden Party SVG Collection
![]() A7 Sized Envelope and Cards with Bonus A7.5 Envelope SVG Kit
A7 Sized Envelope and Cards with Bonus A7.5 Envelope SVG Kit
Dimensions
Here are the exact shapes, sizes and colors I used. Use the Keep Proportions option to keep the shapes’ proportions while sizing to the dimensions shown below.
| Moonlight Garden Party SVG Collection | ||
| azalea.svg | 7" wide | Pink |
| button.svg | 0.65" wide | Green |
| gate.svg | 3.4" wide | Cream |
| oval_frame.svg | 4.4" wide | Cream Pattern (BoBunny Jazmyne Botanical) |
| oval_frame.svg (Blackout) | 4.4" wide | Purple Pattern (BoBunny Jazmyne Twilight) |
| raspberry_top.svg | 0.8" wide | Pink |
| raspberry_bottom.svg | 0.8" wide | Green |
| scallop1.svg | 1" wide | Green |
| scallop2.svg | 1.4" wide | Pink |
Design Tips
- My card base is A7-sized, which is simply a 5" by 14" rectangle, folded in half to 5” by 7.” I used BoBunny Jazmyne Wellspring cardstock and the envelope (A7) is BoBunny Jazmyne cardstock
- For the azalea, I used the "Break Apart" feature to cut the top three layers on a light pink and the two bottom (largest) layers on a darker pink. This is totally optional (and subtle), but it added a nice touch! (It’s those small details that really take projects over the top.)
- On the garden gate, I stamped a viney pattern (rubber stamp by American Crafts - Dear Lizzy line) and then colored lightly in green pencil on some of the leaves and added some tiny purple bling. I wove a delicate dyed ribbon between the pickets along the bottom which I tied in knots on the sides. I don't know what made me think of this, but I love it! Go me!
- I inked the edges of every single piece in brown. This takes a few extra minutes, and it can be tempting to skip this step, but it’s worth doing. This somehow defines the edges, yet blends all the pieces together. It’s the step that makes folks think you should quit your day job!
- I embossed the raspberry using the Cuttlebug Textile Texture folder and rubbed a pink and dark red ink pad over the surface to make it more interesting and berry-like.
- As you can see, I popped out a lot of the elements (using 3D Zots). I added more purple bling and purple brads to the scalloped oval shape and tied more ribbon through the top of the card (I cut two neat slits in the top corners of my card with my Xacto knife). I also tied similar ribbon through the holes in the button.
Thanks for checking out my project, and I hope you like! ~Mary 🙂
8 Responses to “Mary's Corner - Garden Invitation”