

Silhouette Studio Designer Edition version 3 has made some wonderful improvements that will help streamline your SVG workflow while giving you more control over the end result. This is especially true when using files from our store, SVGCuts.com!
Before You Get Started (Centering SVG Files)
By default, Silhouette Studio Designer Edition may not have SVG files set to "Center" when you open them. This may give the illusion that SVG files are blank when you open them when they're actually located somewhere off of the mat (you may have to scroll up/down, left/right to locate the actual cut file). Instead of having to search for the cut, you can change a quick preference to ensure that your designs will always show up on the center of your cutting mat in Silhouette Studio Designer Edition. Just follow these easy steps!
1. On a Mac, Click Silhouette Studio from your tool bar, on a PC, click Edit.
2. Select Preferences.
3. Click the Import Options section of the Preferences menu.

4. Click the Centered radio button under the When Importing SVG section.
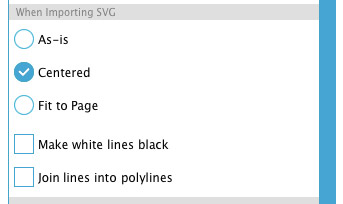
5. Click Apply
6. That's it! You've successfully set your SVG files to center when you open them using the File >> Open method!
Importing SVG Files In Silhouette Studio Designer Edition V3
The following video will show you how to import and prepare SVG files for cutting with Silhouette Studio Designer Edition. The first part of the video shows you how to add the files to the built-in Silhouette Studio Library and the second part shows you how to open them temporarily using the File >> Open option. Both are correct methods and which one you use is completely up to you.
9 Responses to “Using SVG Files With Silhouette Studio Designer Edition Version 3”